Documents 5.b: Access the project Twinspace
From eTwinning
m (Documentación 5 trasladada a Documentos 5.b: Acceso al TwinSpace) |
Belen.rojas (Talk | contribs) |
||
| (35 intermediate revisions not shown) | |||
| Line 1: | Line 1: | ||
| - | + | ''Back to [[Unit 5]]'' | |
| + | <div style="text-align: justify;"> | ||
| + | <br> | ||
| - | + | Once a project has been accepted, you must access TwinSpace. There are different ways to do this. | |
| - | + | <br> FOR A TEACHER WHO IS A PROJECT MEMBER: | |
| - | + | Access the eTwinning Desktop using your password and username. | |
| - | [[Image:5 | + | <br> |
| + | |||
| + | ::a) On the left in the eTwinning Desktop, in the Profile tab, selecting the project you want to access and clicking '''''TwinSpace'''''. | ||
| + | ::<br> | ||
| + | ::[[Image:Eng 5 21.png|thumb|center|597px]]<br> <br> | ||
| + | |||
| + | ::b) From the section "Projects", in the link for the column "Actions" | ||
| + | |||
| + | <br> [[Image:Eng 5 20.png|thumb|center|549x191px]] | ||
| + | |||
| + | <br> | ||
| + | |||
| + | IF YOU ARE NOT A PROJECT MEMBER, JUST A MEMBER OF TWINSPACE: <br> | ||
| + | |||
| + | This is the case of students, teacher-collaborators and other members... | ||
| + | |||
| + | ::c) By clicking on the address: [http://new-twinspace.etwinning.net/ http://new-twinspace.etwinning.net/] | ||
| + | |||
| + | Once there, insert the username and password you were given in '''TwinSpace''' to '''BEGIN THE SESSION''' ([http://www.etwinning.es/apls/cursos/curso_en/index.php/Documents_6.c._A_practical_example_of_how_to_create_activities Documents 6.c. New users]).<br> | ||
<br> | <br> | ||
| - | + | [[Image:Acceso TwinSpace 2.png|thumb|center|400px]] | |
| - | + | <br> | |
| - | + | You can now access '''TwinSpace'''. | |
| - | + | If a single user has several projects, they can access any TwinSpace they belong to. In this image, the user has 6 TwinSpaces.<br> | |
| - | + | <br> | |
| - | [[Image: | + | [[Image:TwinSpaces del profesor.png|thumb|center|597px]] |
| + | |||
| + | Once you are in, use the link on the top right, MY ACCOUNT section, to choose all your settings: time, day, month, welcome message, username to access TwinSpace, language... or even upload a photo to complete your profile. <br> | ||
<br> | <br> | ||
| - | <br> | + | [[Image:Mi cuenta.png|thumb|center|300px]]<br> |
| - | + | <br> | |
| + | <center> | ||
| + | <swf width="600" height="400">http://atenea.pntic.mec.es/cprn0003/cas/u5/TSLogin/TSLogin.swf</swf> [http://atenea.pntic.mec.es/cprn0003/cas/u5/TSLogin/TSLogin.htm <br> View on full screen] <br> | ||
| + | </center> | ||
| + | ---- | ||
| + | |||
| + | <br> | ||
| - | [[ | + | {| style="width: 100%;" |
| + | |- | ||
| + | | style="width: 50%;" | ''Back to [[Unidad 5|Unit 5]]'' | ||
| + | | style="width: 50%; text-align: right;" | ''Next: [[Documents 5.c: How to change the language in Twinspace]]'' | ||
| + | |} | ||
| + | </div> | ||
| + | [[es:Página Principal|es:Página Principal]] [[ca:Página Principal|ca:Página Principal]] [[ga:Página Principal|ga:Página Principal]] [[eu:Página Principal|eu:Página Principal]] | ||
Current revision as of 10:46, 20 November 2012
Back to Unit 5
Once a project has been accepted, you must access TwinSpace. There are different ways to do this.
FOR A TEACHER WHO IS A PROJECT MEMBER:
Access the eTwinning Desktop using your password and username.
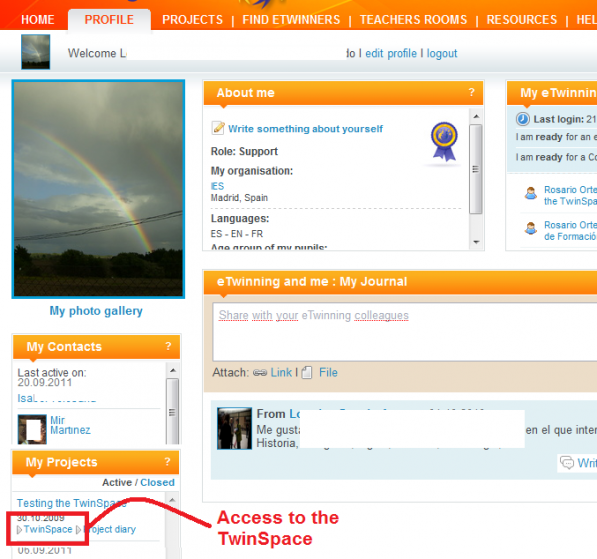
- a) On the left in the eTwinning Desktop, in the Profile tab, selecting the project you want to access and clicking TwinSpace.
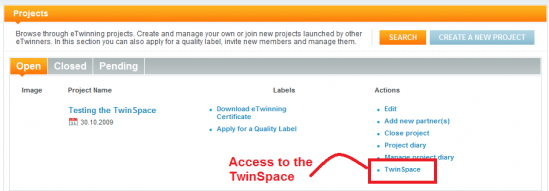
- b) From the section "Projects", in the link for the column "Actions"
IF YOU ARE NOT A PROJECT MEMBER, JUST A MEMBER OF TWINSPACE:
This is the case of students, teacher-collaborators and other members...
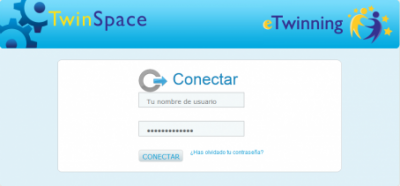
- c) By clicking on the address: http://new-twinspace.etwinning.net/
Once there, insert the username and password you were given in TwinSpace to BEGIN THE SESSION (Documents 6.c. New users).
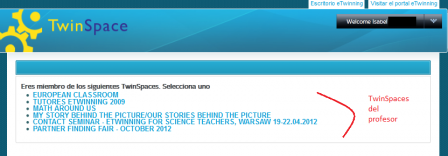
You can now access TwinSpace.
If a single user has several projects, they can access any TwinSpace they belong to. In this image, the user has 6 TwinSpaces.
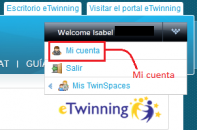
Once you are in, use the link on the top right, MY ACCOUNT section, to choose all your settings: time, day, month, welcome message, username to access TwinSpace, language... or even upload a photo to complete your profile.
View on full screen
| Back to Unit 5 | Next: Documents 5.c: How to change the language in Twinspace |
