Documents 6.c. New users
From eTwinning
Angel.pavon (Talk | contribs) |
Belen.rojas (Talk | contribs) |
||
| (19 intermediate revisions not shown) | |||
| Line 1: | Line 1: | ||
''Back to [[Unidad 6|Unit 6]]'' | ''Back to [[Unidad 6|Unit 6]]'' | ||
<div style="text-align: justify;"> | <div style="text-align: justify;"> | ||
| - | + | Every time a project Twinspace is created, only two users can access it: our partner and ourselves. | |
| - | + | Therefore, the first step to be taken is to register all the teachers and students who are going to take part in the project. Remember that it is always possible to register new users who are incorporated into the project.<br> | |
| - | + | When users are registered, we must decide what role they are going to have within TwinSpace. <br> | |
| - | + | As founders of the project, we have the teacher-administrator role, which has all the possible permits in TwinSpace. <br> <br> | |
| - | + | === Creating users with the role of a teacher or a registered visitor. === | |
| - | + | The process is as follows:<br> | |
| - | + | In the home page of our TwinSpace, go to ''Invite teachers and visitors, ''which is on the left side, under ''Manage members''. | |
| - | + | ||
| - | + | ||
| - | + | ||
| - | In | + | |
| - | + | ||
| - | + | ||
| - | + | ||
| - | + | ||
| - | + | ||
| - | + | ||
| - | + | ||
| - | + | ||
| - | + | ||
| - | + | ||
| - | + | ||
| - | + | ||
| - | + | ||
<br> | <br> | ||
| - | [[Image: | + | [[Image:Invitar miembros TS.png|thumb|center|597px]][[Archivo:im137.jpg|<br>]] |
| - | + | When we click on ''Invite members'', we are given three possibilities: invite teachers, invite pupils and invite visitors.<br> | |
<br> | <br> | ||
| - | + | '''Invite teachers'''<br> | |
| - | + | If what we want to do is invite teachers, the first action we are asked to do is select the country of the teacher we want to invite:<br> | |
<br> | <br> | ||
| - | [[Image: | + | [[Image:Invitar profesores.png|thumb|center|597px]]<br> |
| - | + | Once the country has been selected we can get two different messages.<br> | |
| - | + | If the selected country is integrated into the eTwinning programme, you are reminded that if what you want is his or her participation in the project, what we have to do is invite him or her from the desktop, so the teacher in question has to be registered already, or if not, has to register. <br> | |
| - | + | ||
| - | + | ||
| - | + | ||
| - | + | ||
| - | + | ||
| - | + | ||
| - | + | ||
| - | + | ||
<br> | <br> | ||
| - | [[Image: | + | [[Image:Invitar profesores eTwinning.png|thumb|center|597px]]<br><br> |
| - | + | The other option appears when the teacher belongs to a country which is not part of the eTwinning network. In this case you just have to write the e-mail address of the teacher you wish to invite.<br> | |
<br> | <br> | ||
| - | [[Image: | + | [[Image:Invitar profesores fuera eTwinning.png|thumb|center|597px]]<br> |
| - | + | ||
| - | + | ||
| - | + | When you click on Send a screen appears with a series of fields which you must fill in, among others, the teacher’s school. Both the username and the password assigned by default by the platform can be modified: <br> | |
<br> | <br> | ||
| - | [[Image: | + | [[Image:Invitar profesores datos.png|thumb|center|597px]]<br> |
| - | + | This is also the page on which you have the opportunity to select the role you want to assign to the teacher you are inviting: member teacher or teacher administrador.<br> | |
| - | + | When you click on send, each of the teachers invited in this way receives an invitation in his or her e-mail account.<br><br> | |
| - | + | [[Image:Correo invitación TwinSpace.png|thumb|center|597px]]<br> | |
| - | + | '''Invite pupils'''<br> | |
| - | <br> | + | An eTwinning project is one which is carried out in collaboration with teachers and students from different countries. To foment and encourage the involvement of the students in a project, it is best to register them in the TwinSpace, which permits them to work collaboratively, using in addition all the communications tools available on it.<br> |
| - | + | The steps to be followed are similar to the ones we took for the teacher. We click on ''Invite members'' and select ''Invite students''.<br> | |
<br> | <br> | ||
| - | + | [[Image:Invitar alumnos.png|thumb|center|597px]]<br> | |
| - | + | The platform differentiates two different cases: | |
| - | + | a) Inviting students who already have an account in a TwinSpace, in which case you just have to type in their user name | |
| - | + | b) inviting students who have never been registered in a project TwinSpace, in which case it is necessary to first type in the name and family name of each student.<br> | |
| - | + | ||
| - | + | ||
| - | + | ||
| - | + | ||
| - | + | ||
| - | + | ||
<br> | <br> | ||
| - | + | If we want to invite more than three pupils, click the ""+"" sign above the Send button. Every time we do this three more boxes appear for writing in the names of the new students. Finally, we click on Send.<br><br> | |
| - | + | ||
| - | + | ||
| - | + | ||
| - | + | ||
| - | + | ||
| - | + | ||
| - | + | ||
| - | + | ||
| - | + | ||
| - | + | ||
| - | + | ||
| - | + | ||
| - | + | ||
| - | + | ||
| - | + | [[Image:Invitar alumnos sin cuenta.png|thumb|center|597px]]<br>Now we can see a window to register the data for each student. Firstly, we will see the names and surnames. Now we can see the user name and password to access TwinSpace and that the platform assigns by default, so that you can change them for some that are easier to remember. Lastly, a drop-down list will allow us to assign each student the administrator or member role. <br><br> | |
| - | + | [[Image:Usuarios contraseñas alumnos.png|thumb|center|597px]]<br> | |
| - | + | Once we have clicked Send, we will return to the TwinSpace homepage, and we will see whether the users have registered correctly. <br> | |
<br> | <br> | ||
| - | [[Image: | + | [[Image:Confirmación invitación alumnos.png|thumb|center|597px]]<br> |
| - | + | As opposed to the registration for users with the teacher or registered guest roles, no emails are sent to new users. In this case, we'll receive an email with each student's usernames and passwords we have just invited to Twinspace. <br> | |
| - | + | ||
| - | + | ||
| - | + | ||
| - | + | ||
<br> | <br> | ||
| - | [[Image: | + | [[Image:Act TS 6 6b eng.png|thumb|center|597px]]<br> |
| - | + | '''Remember: the students (members of the project but not partners), as explained in section D''ocuments 5.b: Access to the project TwinSpace'', can access TwinSpace using the link''' [http://new-twinspace.etwinning.net/web/guest;jsessionid=09568846A3710C334E1214A5832A9D80 http://new-twinspace.etwinning.net<br>] | |
| - | <br> | + | <br> The passwords that the system assigns by default to each student can be modified at any moment. To do this, from the TwinSpace homepage, click on Change Pupil passwords in the rectangle which appears on the right under ''Invite members''.<br> |
| - | + | <br> | |
| - | + | [[Image:Cambiar_contraseña_alumnos_1.png|thumb|center|597px]]<br> When you do this, a list of all the students registered in the TwinSpace will appear with the option to Change password beside each of the names.<br> | |
| - | + | <br> | |
| - | <br> | + | [[Image:Cambiar_contraseñas_alumnos_2.png|thumb|center|597px]]<br> |
| - | + | We click on the button corresponding to the student whose password we want to modify, we type in the new one, repeat it, and finally click on Send to finish the process.<br> | |
| - | + | <br> | |
| - | + | [[Image:Cambiar_contraseña_alumnos_3.png|thumb|center|597px]]<br> | |
| - | <br> | + | '''Invite visitors'''<br> |
| - | + | Use this option to invite people to the project who are neither teachers nor students. This is the case of parents or people outside of the school, or who are not registered in the TwinSpace, so that they can get to know what is being done in the project and collaborate in it. It may be a good option, for example, for inviting the director or another member of the school’s administrative team, so that they can see the work that is being done.<br> | |
| - | + | <br> | |
| - | + | [[Image:Invitar_visitantes.png|thumb|center|597px]]<br> | |
| - | + | Once you type in the e-mail address of the person you want to invite and click on Send, they will receive an e-mail inviting them to the TwinSpace with the corresponding link and access information.<br> | |
| - | + | <br> | |
| - | + | [[Image:Correo_invitación_TwinSpace.png|thumb|center|597px]]<br> | |
| - | + | Lastly, you should know that the people you invite will not have administrative rights.<br> | |
<br> | <br> | ||
| - | |||
| - | |||
| - | |||
| - | |||
| - | |||
| - | |||
<br> | <br> | ||
| - | + | <swf width="600" height="400">http://atenea.pntic.mec.es/cprn0003/eng/unit6/eng_TS_AltaProfesores/eng_TS_AltaProfesores.swf</swf> | |
| - | + | [http://atenea.pntic.mec.es/cprn0003/eng/unit6/eng_TS_AltaProfesores/eng_TS_AltaProfesores.htm View on full screen] <br> <br> | |
| - | <br> | + | <br> <swf height="400" width="600">http://atenea.pntic.mec.es/cprn0003/eng/unit6/eng_TS_Altaalumnos/eng_TS_Altaalumnos.swf</swf> |
| - | [ | + | [http://atenea.pntic.mec.es/cprn0003/eng/unit6/eng_TS_Altaalumnos/eng_TS_Altaalumnos.htm View on full screen] <br> |
| - | |||
| - | |||
| - | + | From here onward, the contents are optional for the training course. You should read them, but you will not be tested or assessed on them. <br> | |
| - | + | ||
| - | + | ||
| - | + | ||
| - | + | ||
<br> | <br> | ||
| - | |||
| - | |||
| - | |||
| - | |||
| - | |||
| - | |||
| - | |||
| - | |||
| - | |||
| - | |||
| - | |||
| - | |||
| - | |||
| - | |||
| - | |||
| - | |||
| - | |||
| - | |||
| - | |||
| - | |||
| - | |||
| - | |||
| - | |||
| - | |||
| - | |||
| - | |||
| - | |||
| - | |||
| - | |||
| - | |||
| - | |||
| - | |||
| - | |||
| - | |||
| - | |||
| - | |||
| - | |||
| - | |||
| - | |||
| - | |||
| - | |||
| - | |||
| - | |||
| - | |||
| - | |||
| - | |||
| - | |||
| - | |||
| - | |||
| - | |||
| - | |||
| - | |||
| - | |||
| - | |||
| - | |||
| - | |||
| - | |||
| - | |||
| - | |||
| - | |||
| - | |||
| - | |||
| - | |||
| - | |||
| - | |||
| - | |||
| - | |||
| - | |||
| - | |||
| - | |||
| - | |||
| - | |||
| - | |||
| - | |||
| - | |||
| - | |||
| - | |||
| - | |||
| - | |||
| - | |||
| - | |||
| - | |||
| - | |||
| - | |||
| - | |||
| - | |||
| - | |||
| - | |||
| - | |||
| - | |||
| - | |||
| - | |||
| - | |||
| - | |||
| - | |||
| - | |||
| - | |||
| - | |||
| - | |||
| - | |||
| - | |||
| - | |||
| - | |||
| - | |||
| - | |||
| - | |||
| - | |||
| - | |||
| - | |||
| - | |||
| - | |||
| - | |||
| - | |||
| - | |||
| - | |||
| - | |||
| - | |||
| - | |||
| - | |||
| - | |||
| - | |||
| - | |||
| - | |||
| - | |||
| - | |||
| - | |||
| - | |||
| - | |||
| - | |||
| - | |||
| - | |||
| - | |||
| - | |||
| - | |||
| - | |||
| - | |||
| - | |||
| - | |||
| - | |||
| - | |||
| - | |||
| - | |||
| - | |||
---- | ---- | ||
| Line 360: | Line 154: | ||
| style="width: 50%; text-align: right;" | ''Next: [[Documents 6.d. Project Diary. eTwinning groups. Learning events]]'' | | style="width: 50%; text-align: right;" | ''Next: [[Documents 6.d. Project Diary. eTwinning groups. Learning events]]'' | ||
|} | |} | ||
| - | </div> | + | |
| + | <br> | ||
| + | </div> | ||
| + | [[es:Página Principal|es:Página Principal]] [[ca:Página Principal|ca:Página Principal]] [[ga:Página Principal|ga:Página Principal]] [[eu:Página Principal|eu:Página Principal]] | ||
| + | |||
| + | <br> | ||
Current revision as of 09:19, 20 November 2012
Back to Unit 6
Every time a project Twinspace is created, only two users can access it: our partner and ourselves.
Therefore, the first step to be taken is to register all the teachers and students who are going to take part in the project. Remember that it is always possible to register new users who are incorporated into the project.
When users are registered, we must decide what role they are going to have within TwinSpace.
As founders of the project, we have the teacher-administrator role, which has all the possible permits in TwinSpace.
Creating users with the role of a teacher or a registered visitor.
The process is as follows:
In the home page of our TwinSpace, go to Invite teachers and visitors, which is on the left side, under Manage members.
When we click on Invite members, we are given three possibilities: invite teachers, invite pupils and invite visitors.
Invite teachers
If what we want to do is invite teachers, the first action we are asked to do is select the country of the teacher we want to invite:
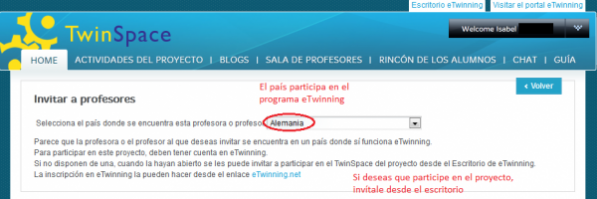
Once the country has been selected we can get two different messages.
If the selected country is integrated into the eTwinning programme, you are reminded that if what you want is his or her participation in the project, what we have to do is invite him or her from the desktop, so the teacher in question has to be registered already, or if not, has to register.
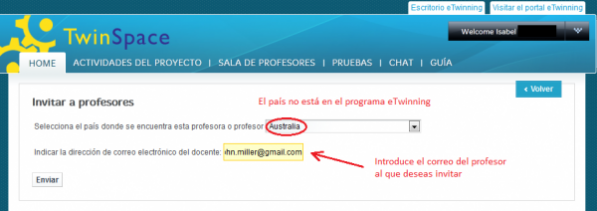
The other option appears when the teacher belongs to a country which is not part of the eTwinning network. In this case you just have to write the e-mail address of the teacher you wish to invite.
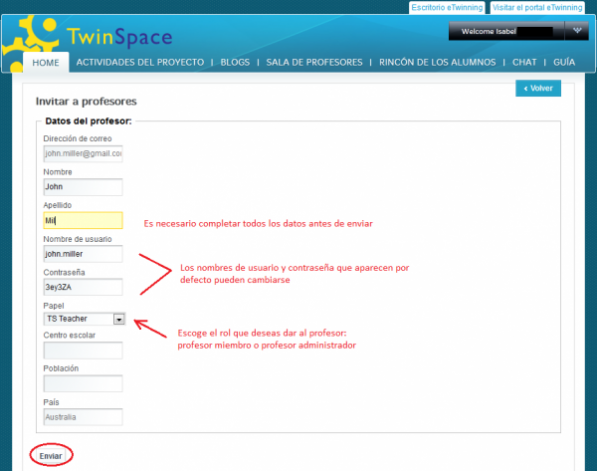
When you click on Send a screen appears with a series of fields which you must fill in, among others, the teacher’s school. Both the username and the password assigned by default by the platform can be modified:
This is also the page on which you have the opportunity to select the role you want to assign to the teacher you are inviting: member teacher or teacher administrador.
When you click on send, each of the teachers invited in this way receives an invitation in his or her e-mail account.
Invite pupils
An eTwinning project is one which is carried out in collaboration with teachers and students from different countries. To foment and encourage the involvement of the students in a project, it is best to register them in the TwinSpace, which permits them to work collaboratively, using in addition all the communications tools available on it.
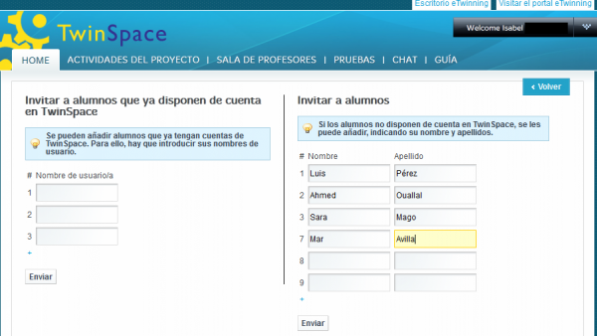
The steps to be followed are similar to the ones we took for the teacher. We click on Invite members and select Invite students.
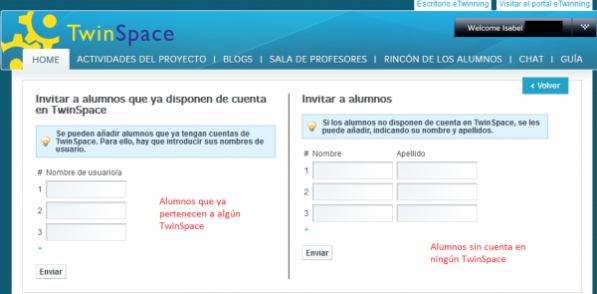
The platform differentiates two different cases:
a) Inviting students who already have an account in a TwinSpace, in which case you just have to type in their user name
b) inviting students who have never been registered in a project TwinSpace, in which case it is necessary to first type in the name and family name of each student.
If we want to invite more than three pupils, click the ""+"" sign above the Send button. Every time we do this three more boxes appear for writing in the names of the new students. Finally, we click on Send.
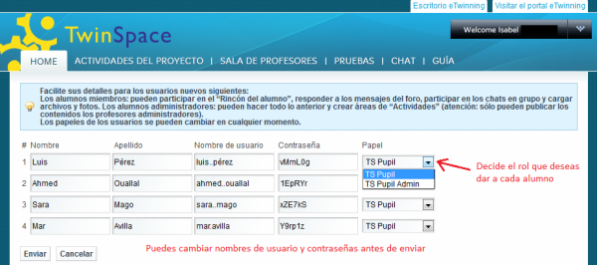
Now we can see a window to register the data for each student. Firstly, we will see the names and surnames. Now we can see the user name and password to access TwinSpace and that the platform assigns by default, so that you can change them for some that are easier to remember. Lastly, a drop-down list will allow us to assign each student the administrator or member role.
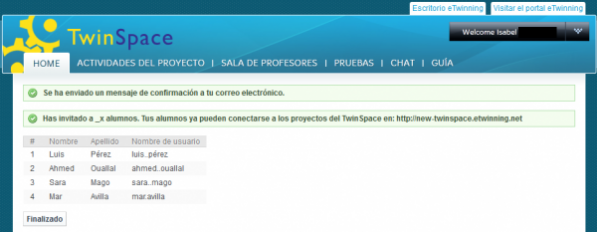
Once we have clicked Send, we will return to the TwinSpace homepage, and we will see whether the users have registered correctly.
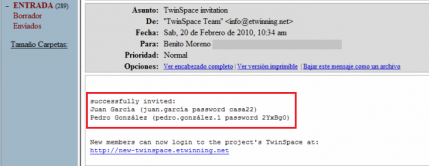
As opposed to the registration for users with the teacher or registered guest roles, no emails are sent to new users. In this case, we'll receive an email with each student's usernames and passwords we have just invited to Twinspace.
Remember: the students (members of the project but not partners), as explained in section Documents 5.b: Access to the project TwinSpace, can access TwinSpace using the link http://new-twinspace.etwinning.net
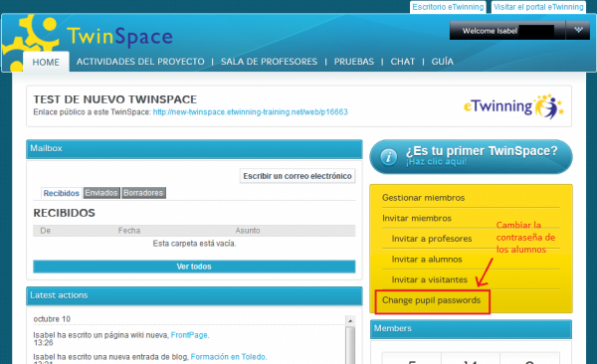
The passwords that the system assigns by default to each student can be modified at any moment. To do this, from the TwinSpace homepage, click on Change Pupil passwords in the rectangle which appears on the right under Invite members.
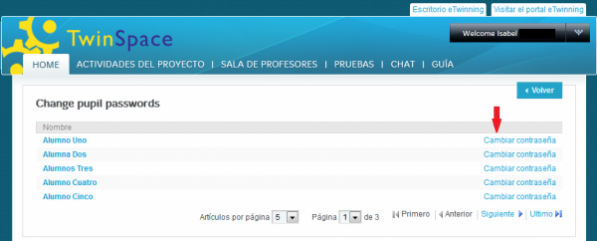
When you do this, a list of all the students registered in the TwinSpace will appear with the option to Change password beside each of the names.
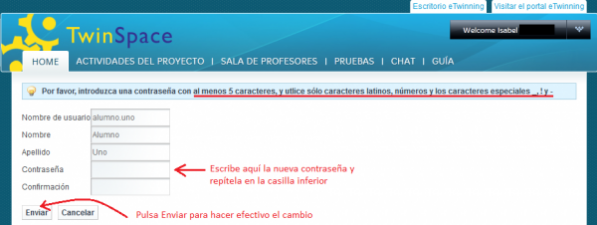
We click on the button corresponding to the student whose password we want to modify, we type in the new one, repeat it, and finally click on Send to finish the process.
Invite visitors
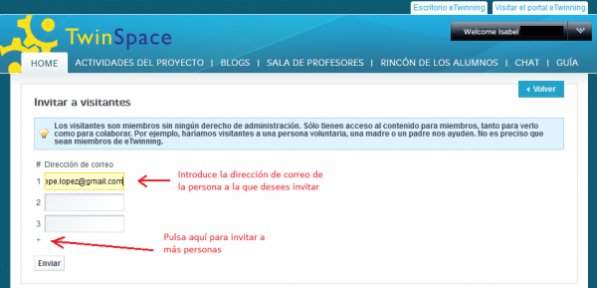
Use this option to invite people to the project who are neither teachers nor students. This is the case of parents or people outside of the school, or who are not registered in the TwinSpace, so that they can get to know what is being done in the project and collaborate in it. It may be a good option, for example, for inviting the director or another member of the school’s administrative team, so that they can see the work that is being done.
Once you type in the e-mail address of the person you want to invite and click on Send, they will receive an e-mail inviting them to the TwinSpace with the corresponding link and access information.
Lastly, you should know that the people you invite will not have administrative rights.
From here onward, the contents are optional for the training course. You should read them, but you will not be tested or assessed on them.
| Back to Unit 6 | Next: Documents 6.d. Project Diary. eTwinning groups. Learning events |


