Documents 6.a. Other sections in Twinspace. Adding and deleting tabs
From eTwinning
Angel.pavon (Talk | contribs) |
Belen.rojas (Talk | contribs) |
||
| (16 intermediate revisions not shown) | |||
| Line 1: | Line 1: | ||
''Back to [[Unidad 6|Unit 6]]'' | ''Back to [[Unidad 6|Unit 6]]'' | ||
| + | |||
| + | <br> | ||
<div style="text-align: justify;"> | <div style="text-align: justify;"> | ||
| - | We shall end Unit 5 by studying in depth the section entitled Activity page. We shall continue exploring other sections in Twinspace.<br> | + | We shall end Unit 5 by studying in depth the section entitled '''Activity page'''. We shall continue exploring other sections in Twinspace.<br> |
| - | + | <br> | |
| - | + | [[Image:Otras secciones TwinSpace.png|thumb|center|597px]]<br> | |
| - | == | + | == Blog == |
| - | + | The Blogs section is aimed at publicising, in the form of news items, our project and its development to anyone who accesses the eTwinning portal. <br>The section looks like this:<br> | |
| - | + | <br> | |
| - | + | [[Image:Blog TwinSpace.png|thumb|center|597px]]<br>It is structured like a Blog, and entries can be made as explained in the section Project activities. As you can see, a first entry appears by default and you can modify or delete it if you wish.<br> | |
| - | + | <br> | |
| - | + | == Teachers’ Room == | |
| - | + | This section is used as a means of communicating with other participants in the project with a “teacher-administrator” or “teacher-member” profile and student or visitor profiles cannot access (other existing profiles will be detailed in the following unit). It is the perfect place to communicate, plan the project tasks or save any data related to classroom management, such as assessment, marks, etc.<br> | |
| - | + | As well as a library with documents, it has a Forum tool, which is useful to facilitate the planning and organization of the project and for teachers to be in constant touch and discuss topics of their interest in private. <br> | |
| - | + | The special characteristic which this section has is that the students cannot access it, it will not even be visible when they access the TwinSpace. <br> | |
| - | <br>''' | + | <br> |
| - | <br> | + | |
| - | {| style="width: 100%; | + | [[Image:Sala de profesores.png|thumb|center|597px]]<br> <br><br> |
| + | |||
| + | == Students’ Corner == | ||
| + | |||
| + | Students also have a "private" area, which is similar to the Teachers’ Room; in the top menu, to the right of the tab “Teachers’ Room”, an informal space where the students who are members of TwinSpace can interact and exchange materials that are not necessarily connected to their school project, thus enriching their private life. They can introduce themselves to the rest of the members in the project, offer information about themselves, take part in debates through the Forum and work on the project. In order to enable these activities, the Students’ Corner has a Forum and a Document library, and more tools can be added if necessary. Taking part in the Students’ Corner promotes a feeling of self-sufficiency and responsibility in students. <br> | ||
| + | |||
| + | In this space teachers cannot write or modify contents, but they can read them.<br> | ||
| + | |||
| + | <br> | ||
| + | |||
| + | [[Image:Rincón alumnos.png|thumb|center|597px]]<br> <br>[http://www.etwinning.es/en/ideas/recommendations/404-la-implicacion-del-alumnado-como-factor-de-exito-del-proyecto Learn more] (commitment on behalf of students) | ||
| + | |||
| + | <br> '''IMPORTANT:''' In order to guarantee privacy and safety for teachers and students in eTwinning, the “Teachers’ Room” and the “Students’ Corner” are private spaces, which means that only members of TwinSpace with a teacher or student profile can access these sections. In addition, these sections cannot be made public like other activity pages. | ||
| + | |||
| + | == <br>Chat == | ||
| + | |||
| + | It is the next section in the main menu. If we click on this tab, we shall get direct access to the chat tool, where we and our students can talk to the remaining members of the project. | ||
| + | |||
| + | The chat is a tool under constant development and adaptation to TwinSpace. This is why not all the functions are currently available. However, we can take part in the general chat and we shall also have the chance to chat privately with other participants connected to the chat. The main features of the chat are: | ||
| + | |||
| + | <br> | ||
| + | |||
| + | [[Image:Eng 6 10.png|thumb|center|597px]] | ||
| + | |||
| + | <br> | ||
| + | |||
| + | #General chat. In this window we can see the discussion line that all connected users are taking part in. | ||
| + | #The participants’ window. In this window we can see a list of participants in the general chat. | ||
| + | #Commands to edit the font. Here we can choose the type of font, the size and the colour. We can also choose if we want the font to appear in bold or italics. | ||
| + | #Text window. Here you can write the message you wish to share with the other participants. | ||
| + | #SEND. Once you have edited your message, click here to see the main chat window. | ||
| + | |||
| + | <br> | ||
| + | |||
| + | We can also start a private conversation with a participant in the chat. In order to do so, right-click on the name of one of the participants in the window “participants”. Then choose the option “Go private”. In the top menu we will see a new tab that will take us to the private chat.<br> | ||
| + | |||
| + | '''IMPORTANT''': only two users can participate in private chats.<br> | ||
| + | |||
| + | <br> | ||
| + | |||
| + | == Guide == | ||
| + | |||
| + | When we click on this tab, the system redirects us to the homepage of the Central Support Service that contains the TwinSpace guide; it can help you make the most of the collaborative space of your projects. <br> | ||
| + | |||
| + | The manual has the following appearance: <br> | ||
| + | |||
| + | <br> | ||
| + | |||
| + | [[Image:Oct12Otras4.png|thumb|center|597px]] <br> <br> | ||
| + | |||
| + | == Adding and deleting tabs == | ||
| + | |||
| + | TwinSpace lets us personalize the tabs we want to see. To add a new tab we click on the Add page button: <br> | ||
| + | |||
| + | <br> | ||
| + | |||
| + | [[Image:Oct12Otras5.png|thumb|center|300px]]<br> | ||
| + | |||
| + | A text box appears where we can put the name of the new tab and then we click on Save: <br> | ||
| + | |||
| + | <br> | ||
| + | |||
| + | [[Image:Oct12Otras6.png|thumb|center|300px]]<br> | ||
| + | |||
| + | The new tab is created like this. Now we have to add tools to be able to work in it: <br> | ||
| + | |||
| + | <br> | ||
| + | |||
| + | [[Image:Oct12Otras7.png|thumb|center|597px]]<br> | ||
| + | |||
| + | Finally we should indicate that we can also delete the tabs, even the important sections like Project activities or Teachers’ room. To delete a tab we pass the Mouse over it: a small red circle then appears in the top right hand corner which, if we click on it, will delete the tab. <br> | ||
| + | |||
| + | <br> | ||
| + | |||
| + | [[Image:Oct12Otras8.png|thumb|center|200px]] | ||
| + | |||
| + | ---- | ||
| + | |||
| + | {| class="FCK__ShowTableBorders" style="width: 100%;" | ||
|- | |- | ||
| style="width: 50%;" | ''Back to [[Unidad 6|Unit 6]]'' | | style="width: 50%;" | ''Back to [[Unidad 6|Unit 6]]'' | ||
| - | | style="text-align: right; width: 50%;" | ''Next: [[Documents 6.b. | + | | style="text-align: right; width: 50%;" | ''Next: [[Documents 6.b. Teacher and student profiles. Visitor’s profile.|Documents 6.b. Teacher and student profiles. Visitor’s profile.]]'' |
|} | |} | ||
| - | <br></div> | + | <br><br></div> |
| - | <br> | + | <br> |
| + | |||
| + | <br> | ||
| + | |||
| + | [[es:Página Principal|es:Página Principal]] [[ca:Página Principal|ca:Página Principal]] [[ga:Página Principal|ga:Página Principal]] [[eu:Página Principal|eu:Página Principal]] | ||
Current revision as of 08:26, 20 November 2012
Back to Unit 6
We shall end Unit 5 by studying in depth the section entitled Activity page. We shall continue exploring other sections in Twinspace.
Contents |
Blog
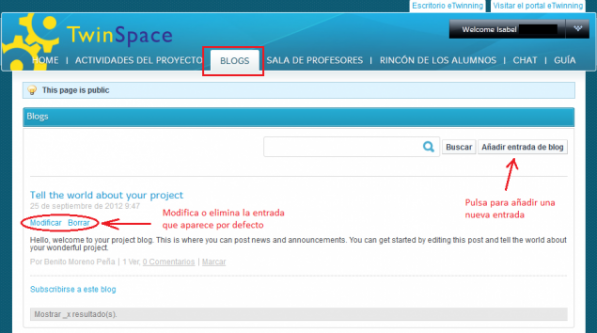
The Blogs section is aimed at publicising, in the form of news items, our project and its development to anyone who accesses the eTwinning portal.
The section looks like this:
It is structured like a Blog, and entries can be made as explained in the section Project activities. As you can see, a first entry appears by default and you can modify or delete it if you wish.
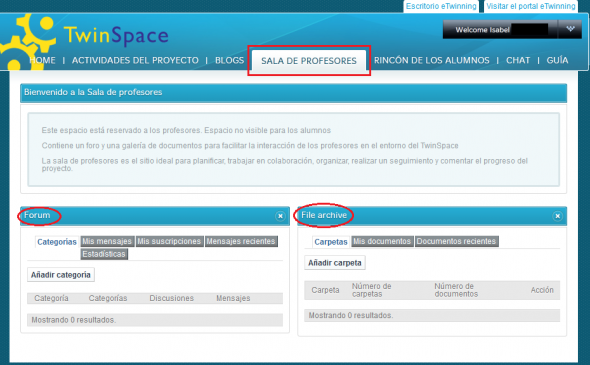
Teachers’ Room
This section is used as a means of communicating with other participants in the project with a “teacher-administrator” or “teacher-member” profile and student or visitor profiles cannot access (other existing profiles will be detailed in the following unit). It is the perfect place to communicate, plan the project tasks or save any data related to classroom management, such as assessment, marks, etc.
As well as a library with documents, it has a Forum tool, which is useful to facilitate the planning and organization of the project and for teachers to be in constant touch and discuss topics of their interest in private.
The special characteristic which this section has is that the students cannot access it, it will not even be visible when they access the TwinSpace.
Students’ Corner
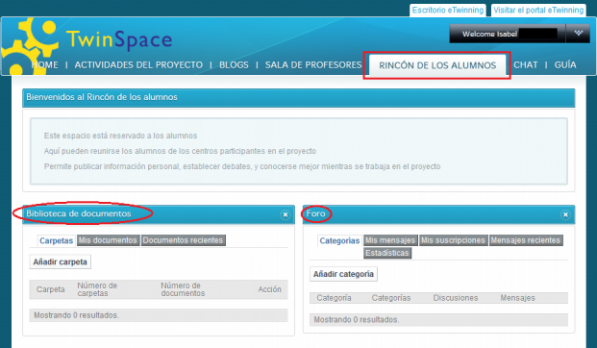
Students also have a "private" area, which is similar to the Teachers’ Room; in the top menu, to the right of the tab “Teachers’ Room”, an informal space where the students who are members of TwinSpace can interact and exchange materials that are not necessarily connected to their school project, thus enriching their private life. They can introduce themselves to the rest of the members in the project, offer information about themselves, take part in debates through the Forum and work on the project. In order to enable these activities, the Students’ Corner has a Forum and a Document library, and more tools can be added if necessary. Taking part in the Students’ Corner promotes a feeling of self-sufficiency and responsibility in students.
In this space teachers cannot write or modify contents, but they can read them.
Learn more (commitment on behalf of students)
IMPORTANT: In order to guarantee privacy and safety for teachers and students in eTwinning, the “Teachers’ Room” and the “Students’ Corner” are private spaces, which means that only members of TwinSpace with a teacher or student profile can access these sections. In addition, these sections cannot be made public like other activity pages.
Chat
It is the next section in the main menu. If we click on this tab, we shall get direct access to the chat tool, where we and our students can talk to the remaining members of the project.
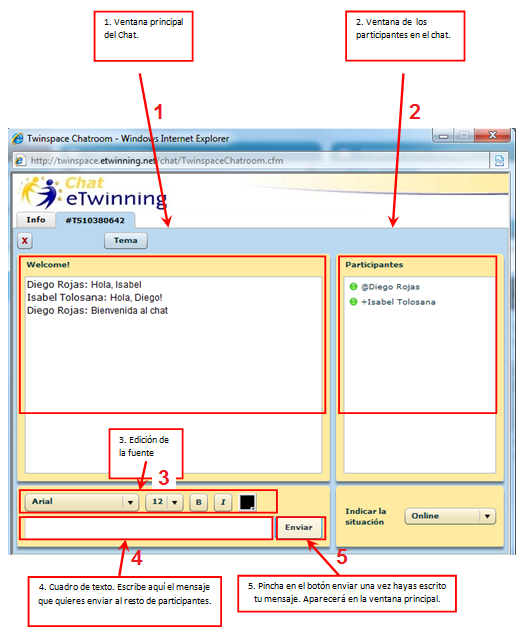
The chat is a tool under constant development and adaptation to TwinSpace. This is why not all the functions are currently available. However, we can take part in the general chat and we shall also have the chance to chat privately with other participants connected to the chat. The main features of the chat are:
- General chat. In this window we can see the discussion line that all connected users are taking part in.
- The participants’ window. In this window we can see a list of participants in the general chat.
- Commands to edit the font. Here we can choose the type of font, the size and the colour. We can also choose if we want the font to appear in bold or italics.
- Text window. Here you can write the message you wish to share with the other participants.
- SEND. Once you have edited your message, click here to see the main chat window.
We can also start a private conversation with a participant in the chat. In order to do so, right-click on the name of one of the participants in the window “participants”. Then choose the option “Go private”. In the top menu we will see a new tab that will take us to the private chat.
IMPORTANT: only two users can participate in private chats.
Guide
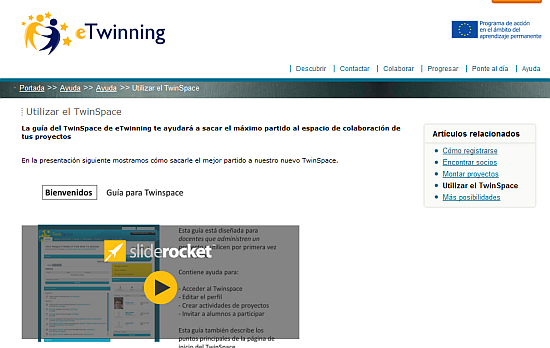
When we click on this tab, the system redirects us to the homepage of the Central Support Service that contains the TwinSpace guide; it can help you make the most of the collaborative space of your projects.
The manual has the following appearance:
Adding and deleting tabs
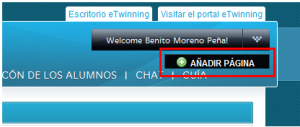
TwinSpace lets us personalize the tabs we want to see. To add a new tab we click on the Add page button:
A text box appears where we can put the name of the new tab and then we click on Save:
The new tab is created like this. Now we have to add tools to be able to work in it:
Finally we should indicate that we can also delete the tabs, even the important sections like Project activities or Teachers’ room. To delete a tab we pass the Mouse over it: a small red circle then appears in the top right hand corner which, if we click on it, will delete the tab.
| Back to Unit 6 | Next: Documents 6.b. Teacher and student profiles. Visitor’s profile. |

