Documents 5.d: Explore the sections in TwinSpace
From eTwinning
Belen.rojas (Talk | contribs) |
Belen.rojas (Talk | contribs) |
||
| (55 intermediate revisions not shown) | |||
| Line 1: | Line 1: | ||
''Back to [[Unidad 5|Unit 5]]'' <br> <br> | ''Back to [[Unidad 5|Unit 5]]'' <br> <br> | ||
| - | Each TwinSpace has a fixed structure of | + | Each TwinSpace has a fixed structure of 7 main sections that appear in the top menu of the page – '''Home''', '''Project Activities''', '''Staff Room''', '''Pupils’ Corner, Chat '''and '''Guidelines'''. Although you can add or delete sections, we recommend that you do not change these seven which appear by default until you have mastered using the TwinSpace.<br> |
<br> | <br> | ||
| - | [[Image:Img 5 | + | [[Image:Img 5 6b.png|thumb|center|550px]]<br> |
== HOME<br> == | == HOME<br> == | ||
<div style="text-align: justify;"> | <div style="text-align: justify;"> | ||
| - | When teachers Access TwinSpace, the default section shown is HOME. Here you will find | + | When teachers Access TwinSpace, the default section shown is HOME. Here you will find 5 modules:<br> |
| - | + | <br> | |
| - | <br>'''1 - | + | [[Image:Img 5 7b.png|thumb|center|550px]]<br>'''1''-'''''<i>'</i>'''Inbox''': this tool allows you to manage e-mails exchanged among the members of the TwinSpace (1 or several at a time).<br> '''2 -''' '''Latest actions: '''this window shows the last actions carried out in TwinSpace, with a link to the profile of the user who has done it and another link to the page where it has been done, such as a new post in a blog or the load of a document. Something similar to this image:<br> |
| - | + | '''3- Calendar''': with this digital tool you can add the dates of events that all participants are to remember. Each country has special dates that may not coincide with those of the partner country (local bank holiday, holidays…). <br> | |
| - | [ | + | '''4-''' '''Organising members''': this window offers us the possibility to add new members into TwinSpace: students, teachers and visitors. It also allows us to change the students’ password ([http://www.etwinning.es/apls/cursos/curso_en/index.php/Documents_6.b._User_registration Documents 6.b. User registration]). |
| - | + | '''5- Members''': from this window you can access the profiles of all TwinSpace members. <br> <br> | |
| + | <center> | ||
| + | <swf height="400" width="600">http://atenea.pntic.mec.es/cprn0003/cas/u5/TSHome/TSHome.swf</swf> [http://atenea.pntic.mec.es/cprn0003/cas/u5/TSHome/TSHome.htm <br> View on full screen] <br> | ||
| + | </center> | ||
| + | <br> <br> | ||
| - | + | === How to use the inbox === | |
| - | <br> | + | TwinSpace mail is internal, that is we can only send and receive messages from other participants in our TwinSpace. The TwinSpace mail module looks like this:<br> |
| - | + | <br> | |
| - | + | [[Image:Img_5_7c.png|thumb|center|550px]]<br> | |
| - | + | 1.- Using these tabs we can access the three folders where messages are stored: Received, where the messages we have been sent by other participants are kept, Sent, where the messages we have sent are kept; and Drafts, where we can keep messages we haven’t sent yet. <br> | |
| - | + | 2.-The messages in each folder appear in this area. We can see the content by clicking on the message. The Actions button allows us to see, answer or delete a message. <br>3.- The Write an e-mail button allows you to send a message to another participant in our TwinSpace. A window will appear like the one below.<br> | |
| - | <br> | + | <br> |
| - | + | [[Image:Img_5_7d.png|thumb|center|550px]]<br> | |
| - | + | We write the subject and the body of the message. Then we mark the TwinSpace participants we want to send the mail to (although it can be just one person if we wish). Finally we click on Send to send the message or Save Draft if we don’t want to send it but want to edit it later on.<br><br> | |
| - | + | <center> | |
| + | <swf width="600" height="400">http://atenea.pntic.mec.es/cprn0003/cas/u5/TSBuzon/TSBuzon.swf</swf> [http://atenea.pntic.mec.es/cprn0003/cas/u5/TSBuzon/TSBuzon.htm <br> View on full screen] <br> | ||
| + | </center> | ||
=== How to insert an event in the calendar === | === How to insert an event in the calendar === | ||
| - | + | The calendar is recommended to:<br>• Set dates and/or times for communication (chat sessions, posts in the forum, blog…).<br>• Set deadlines to hand in activities.<br>• Set important dates for the content of the project (Environment Day, Internet Day, Language Day, Peace Day, etc.).<br>• Remember dates that are connected with a certain work process (measuring temperature, looking for a piece of news in the paper, watching a TV channel, buying the paper…).<br>• Project start and end dates.<br>• Others.<br><br> | |
| - | + | To add a new event to the calendar, we click on '''Add event'''. | |
| - | <br> | + | [[Image:5e7ab.png|thumb|center|550px]]<br> |
| - | + | Now you must fill in each of the fields requested. There are other possibilities you can choose depending on your needs. The system may even send a reminder to all those people involved. Once the first event has been included in the diary, click '''Save''' to move onto the next day.<br> | |
| - | <br> | + | [[Image:Eng 5 26.png|thumb|center|445x562px]]<br> |
| - | + | The event has been recorded in the TwinSpace calendar and now all participants can see it. | |
| - | |||
| - | |||
| - | + | [[Image:5e_9ab.png|thumb|center|400px]] <br> | |
| + | |||
| + | We can see that there are different options. If the note is not for today (date) but for tomorrow and we want to check when the event is being organised and what it is about, click on the word Week; should it not even be this week, we would click on Month or Year, depending on our needs. Now you will see a calendar showing the events inserted. In order to find out more details about each note/event, you simply have to click on the highlighted word. | ||
<br> | <br> | ||
| - | + | [[Image:5e_10ab.png|thumb|center|500px]]<br> | |
| - | + | <center> | |
| + | <swf height="400" width="600">http://atenea.pntic.mec.es/cprn0003/cas/u5/TSCalendario/TSCalendario.swf</swf> [http://atenea.pntic.mec.es/cprn0003/cas/u5/TSCalendario/TSCalendario.htm <br> View on full screen] <br> | ||
| + | </center> | ||
| - | + | == PROJECT ACTIVITIES<br> == | |
| - | + | To the right of the HOME tab you will see a section entitled PROJECT ACTIVITIES. Here you will develop you project; you can create new pages and manage them, and then publish, hide or delete the existing ones. | |
| - | + | <br> | |
| - | [[Image: | + | [[Image:Img5_10b.png|thumb|center|550px]]<br> |
| - | + | Coordinators and students will define the project structure and the activities to be done; all the members must agree on the structure both of the project and of the TwinSpace; otherwise, the Activity Page section will only be a series of unconnected pages, without no connection whatsoever to the general planning. | |
| - | + | The “Project Activities” will be different in each TwinSpace because they will individually reflect the pedagogical objectives and the structure of each project. | |
| - | + | In order to develop this section, we shall work with a very simple and basic example. | |
| - | + | Let’s say that it is a project with two members from countries country_1 and country_2. The coordinators have designed the tasks to distribute the students into mixed-nationality groups. In addition, students are old and self-sufficient enough to access Twinspace and are members of TwinSpace (See [http://www.etwinning.es/apls/cursos/curso_en/index.php/Documents_6.a._Teacher_profiles unit 6]). Let’s imagine that the work will be stored into Twinspace in the following order:<br> | |
| - | + | <br> | |
| - | + | {| border="1" style="margin: 0pt 0pt 1em 1em; float: left; width: 173px; height: 154px;" | |
| - | + | ||
| - | {| border="1" style="margin: 0pt 0pt 1em 1em; float: left;" | + | |
|- | |- | ||
| - | | ''' | + | | '''Activity pages''' |
|- | |- | ||
| - | | 1.- | + | | 1.- Presentation |
|- | |- | ||
| - | | 2.- | + | | 2.- Work plan |
|- | |- | ||
| - | | 3.- | + | | 3.- Search for information |
|- | |- | ||
| - | | 4.- | + | | 4.- Information analysis |
|- | |- | ||
| - | | 5.- | + | | 5.- Results and conclusions |
|- | |- | ||
| - | | 6.- | + | | 6.- Assessment |
|} | |} | ||
| Line 116: | Line 122: | ||
<br> | <br> | ||
| - | === | + | <br> |
| + | |||
| + | === How to create an activity page<br> === | ||
| - | + | First of all, we shall create an activity page and then we shall insert some collaboration and/or communication tools offered by TwinSpace. The process is simple: we must go to the '''Activity''' module and click on '''''Manage tools'''''. | |
<br> | <br> | ||
| - | [[Image: | + | [[Image:Oct12a.png|thumb|center|550px]]<br> |
| + | |||
| + | A message appears with information on permission to see the activity which is going to be created. We click on Incorporate a tool… to continue.<br> | ||
<br> | <br> | ||
| - | + | [[Image:Oct12c.png|thumb|center|550px]]<br> | |
| - | + | A form subsequently appears to create the activity which has three parts:<br> | |
<br> | <br> | ||
| - | [[Image: | + | [[Image:Oct12d.png|thumb|center|550px]] |
<br> | <br> | ||
| - | + | <br>1.- In this area we type in the title of the activity. In this example we are going to create a page called '''Test Page'''. <br> | |
| - | + | 2.- We then have to decide which modules or applications we want to include in the activity out of the six possible choices: Blog, library, forum, image gallery, Wiki or web content. We don’t have to worry if we are going to need other modules or delete any we have chosen at a later date, as they can be changed at any moment. We will explain later on how each of the modules works. <br> | |
| - | <br> | + | 3.- Once we have typed in the title and chosen some of the modules, click "Add". This is a simple way to build ourTwinSpace little by little. <br> |
| - | + | When the activity is created a screen like this appears:<br><br> | |
| - | <br> | + | [[Image:Oct12f.png|thumb|center|550px]]<br> |
| - | [[Image: | + | Using the “Publish” button we can make the activity publicly available, that is it can be seen by users who are not registered on our TwinSpace. If it is not published then it will only be accessible to those who are registered in the TwinSpace. It is the job of the teacher-administrator to publish or hide the page. A student cannot publish (which means allowing everyone to see the page). ([http://www.etwinning.es/apls/cursos/curso_en/index.php/Unit_6 See unit 6]).<br> |
| + | |||
| + | If we now click on the “Project Activities” tab we can see if we have created the “Test Page” correctly.<br><br> | ||
| + | |||
| + | [[Image:Oct12e.png|thumb|center|400px]]<br> | ||
| + | |||
| + | The initial look of a page that has just been inserted may be slightly barren, as only the inserted modules appear. However, now is when the administrators have to intervene (students or teachers), by creating different spaces where participants can work actively and dynamically. In our example, the appearance of the activity we have created is as follows:<br> | ||
<br> | <br> | ||
| - | + | [[Image:Oct12h.png|thumb|center|400px]]<br> | |
| - | + | Repeating the process for creating activities, our project TwinSpace will look like this: <br><br> | |
| - | + | [[Image:Img_5_12.png|thumb|center|550px]]<br> | |
| - | + | Before starting to work, students must become familiar with the structure of TwinSpace and feel curious and interested, as well as motivated to work on the project. <br> <br> | |
| - | <br> | + | === How to manage the modules into an activity page<br> === |
| - | + | Filling the different activity pages with content requires the use of the TwinSpace tools (blog, forum, wiki, document library, image gallery, web content manager), depending on the task to be done. <br> | |
| - | + | When an activity is created we have already indicated which modules we want it to provide. However, it is normal that we may need to add new modules or delete some of the existing ones. <br> | |
| - | <br> | + | We are going to insert different modules or tools in this section and we shall work on the basic possibilities; then we shall find out about the rest, although it is quite intuitive and deals with concepts we are used to seeing today with various ICT tools. <br> |
| + | |||
| + | In order to add a tool, once we are on the page we want, click on the drop-down menu on the top right to see the different options. In this case, we shall choose '''Add tool'''. This can also be done using the Add tool button which appears in the top right hand corner of the activity.<br> | ||
| - | + | <br> | |
| - | + | [[Image:Oct12g.png|thumb|center|450px]]<br> | |
| - | + | Now you will see a window on the left showing two alternatives: '''Collaboration '''and '''Content management.''' In order to know what each one contains, just click on the title and you will see this: | |
<br> | <br> | ||
| - | + | [[Image:Eng 5 35.png|center|220x265px]]<br>You will see: blogs, wikis, forum, libraries, galleries and web content viewers. A whole range of possibilities to insert into each of the pages we create in our '''TwinSpace'''; all we have to do is '''drag '''the tool from the window to the page where we want to place it. Click on the option you chose, a blog for instance, and then drag it to your page; in this case it was a '''Trial Page'''. The only thing we must bear in mind is the design, so that the page is not overloaded. Then, each participant will complete it as decided. In order to follow our example, we shall insert some of these basic options to see what the page looks like. Practice and time will help us discover many functions and possibilities for each tool. <br> | |
| - | |||
| - | |||
| - | + | Some final advice to prepare an activity: | |
| - | + | • Plan what tools are to be included in each activity. Not to improvise, but rather see how we want to work and figure out what tools are more appropriate for that task. • Do not saturate the activity. Including more tools does not mean that it will improve, as it could be quite the opposite. You must be specific and not add useless tools. | |
| - | + | <br>• Do not saturate the activity. Including more tools does not mean that it will improve, as it could be quite the opposite. You must be specific and not add useless tools. | |
| - | + | <br>•Explain to students clearly what they are to do with each tool. It is advisable to spend time helping them understand how the different elements are used in each activity, as once they understand it will be easier to work. | |
| - | + | <center> | |
| + | <swf height="400" width="600">http://atenea.pntic.mec.es/cprn0003/cas/u5/TSActividades/TSActividades.swf</swf> [http://atenea.pntic.mec.es/cprn0003/cas/u5/TSActividades/TSActividades.htm <br> View on full screen] <br> | ||
| + | </center> | ||
| + | <br> | ||
| + | |||
| + | === Let’s start working on a project<br> === | ||
| + | |||
| + | We will start working on the project by following the design steps mentioned at the beginning of document 5.d.2., according to the order established on the activity page. <br> | ||
| + | |||
| + | Remember it is only an example; coordinators are to decide on the number of activity pages, the names, the content, the tools to be used, etc. | ||
| + | |||
| + | <br> | ||
{| border="1" style="margin: 0pt 0pt 1em 1em; float: left;" | {| border="1" style="margin: 0pt 0pt 1em 1em; float: left;" | ||
|- | |- | ||
| - | | ''' | + | | '''Activity pages''' |
|- | |- | ||
| - | | 1.- ''' | + | | 1.- '''Presentation''' |
|- | |- | ||
| - | | 2.- | + | | 2.- Work plan |
|- | |- | ||
| - | | 3.- | + | | 3.- Search for information |
|- | |- | ||
| - | | 4.- | + | | 4.- Information analysis |
|- | |- | ||
| - | | 5.- | + | | 5.- Results and conclusions |
|- | |- | ||
| - | | 6.- | + | | 6.- Assessment |
|} | |} | ||
| Line 219: | Line 246: | ||
<br> | <br> | ||
| - | <br> | + | <br><br> |
| - | + | '''Presentation ''' | |
| - | + | It is important to note that, when it comes to designing activities, we must think about how students are going to interact, both regarding their own tasks and their personal relationships; this stage of the project focuses on socialising online, including tasks that will promote solid interaction amongst partner students and which will make a positive contribution to their involvement in the project. In the folder entitled '''Presentation''', we shall insert the tool '''Document library''', where students will include a file with a short description of themselves. In addition, we shall insert an '''Image Gallery''', where they can include their photo. Students from the partner school must match the photo and the profile. As students will have some trouble matching the photos and the descriptions, we will open a forum where they can ask questions and solve doubts. <br> | |
| + | |||
| + | Now they have all this information, students can start the tasks. They should have a scanned photo and a description of themselves. When doing this activity, it is advisable to assign each student a number so that the title of each photo will only have to be Photo 1, Photo 2, etc. Now we would give them a TwinSpace password each (see Unit 6), we would explain how to add a file into the document library, how to upload images into the image gallery and how the contributions to the forum must be made. Here we shall explain the process step by step: | ||
<br> | <br> | ||
| - | ==== | + | ==== How to upload files into the document library<br> ==== |
| - | - | + | - We are going to create the activity presentation, adding to it the tool "Document library".<br> |
<br> | <br> | ||
| - | [[Image: | + | [[Image:Oct12j.png|thumb|center|550px]]<br> |
| + | |||
| + | -Now we click on the activity “Presentation” so that it opens. We will see the Document Library in the page we want to work on.<br> | ||
<br> | <br> | ||
| - | [[Image: | + | [[Image:Oct12k.png|thumb|center|500px]]<br> |
| + | |||
| + | Click on '''Add folder'''. The system will show this image: | ||
<br> | <br> | ||
| - | [[Image: | + | [[Image:Oct12l.png|thumb|center|450px]]<br> |
| - | + | - Name the folder and provide a description; then click on '''Save''' and you will see a message in green. The page will now look like this: <br> | |
<br> | <br> | ||
| - | [[Image: | + | [[Image:Oct12m.png|thumb|center|450px]]<br> |
| - | + | The message verifies that the process is going correctly. To the right of the folder name you can see the number of subfolders and the documents that have been included, which in this case is 0. | |
| - | - | + | - In order to upload a file into the folder '''Profiles of students from country_1''', click on the folder and you will see this window: <br> |
<br> | <br> | ||
| - | [[Image: | + | [[Image:Oct12n.png|thumb|center|450px]]<br> |
| - | - | + | - Click on '''Add document.''' Before carrying out this action, the system will warn us on the rights regarding the materials we are going to upload into TwinSpace. Pay special attention to this warning. '''Do not upload resources (images, music…) if you are not sure about the rights that apply. ''' |
| - | + | <br> [[Image:Eng 5 19.png|thumb|center|418x159px]]'''<br>'''Let’s suppose we can accept.<br> | |
<br> | <br> | ||
| - | [[Image: | + | [[Image:Oct12p.png|thumb|center|500px]]<br> |
| - | + | Look for the document to be uploaded, which in this case is the WORD document '''Profile_student_1'''. <br>- Once you have clicked '''Open '''on the top right, you will see this:<br> | |
<br> | <br> | ||
| - | [[Image: | + | [[Image:Oct12q.png|thumb|center|450px]]<br> |
| - | - | + | <br>- Message '''1''' indicates that the file has not yet uploaded. Text '''2''' indicates that the file is going to be uploaded. Finally clic on Upload files '''(3)''' and the system will confirm if the file has been uploaded correctly. <br> |
| - | [[Image: | + | <br> |
| + | |||
| + | [[Image:Oct12r.png|thumb|center|500px]]<br> | ||
| - | - | + | - Click on the light blue link ''Profiles of students from country_1'' that is marked with an arrow and you will see the document inside the folder.<br> |
<br> | <br> | ||
| - | [[Image: | + | [[Image:Oct12s.png|thumb|center|500px]]<br> |
| - | - | + | - If we now enter project activities > Presentation you will see that the activity page '''Presentation '''now looks like this:<br> |
<br> | <br> | ||
| - | [[Image: | + | [[Image:Oct12t.png|thumb|center|500px]]<br> |
| - | ==== | + | ==== How to add images into an Image Gallery<br> ==== |
| - | <br>.- | + | <br>.- In the folder '''Presentation''', create the '''''Image gallery''''' where students can upload their photos (images in general). In order to do so, we can return to the window Add tool and then to the section Content management, where you must choose '''''Image gallery'''''. |
<br> | <br> | ||
| - | [[Image: | + | [[Image:Eng 5 41.png|thumb|center|250px]] |
<br> | <br> | ||
| - | .- | + | .- Insert the '''image gallery''' under the viewer (under the document library) that we created before, thus obtaining a new window: |
<br> | <br> | ||
| - | [[Image: | + | [[Image:Oct12v.png|thumb|center|450px]]<br> |
| - | <br> | + | We now have a gallery to include the photos, so the next step is to create two folders: one for photos of students from country_1 and another for photos of students from country_2. <br> |
| - | + | <br>.- To add a new folder inside the gallery, click on''Add folder''. | |
<br> | <br> | ||
| - | [[Image: | + | [[Image:Oct12w.png|thumb|center|450px]]<br> |
| - | <br> | + | <br>You will now see a window where you must insert a title and a description of the folder we are creating. Once the information has been inserted, click on ''Save.'' |
| - | <br>.- | + | <br>.- Next to the folder you have created you will see the button ''Actions'', which allows it to be edited (change the title and the description), delete it or manage permits. |
<br> | <br> | ||
| - | [[Image: | + | [[Image:Oct12x.png|thumb|center|450px]]<br>.- Repeat the process and create a folder inside the gallery so that students from country_2 can add their photos. |
| - | + | Our '''image gallery''' should eventually look like this: | |
| - | + | ||
| - | + | ||
<br> | <br> | ||
| - | [[Image: | + | [[Image:Oct12y.png|thumb|center|450px]]<br> |
| - | + | ||
| - | <br> | + | |
| - | .- | + | .-We can upload the photos into the gallery by taking the same steps we explained in the File Archive. |
<br> | <br> | ||
| - | [[Image: | + | [[Image:Oct12z.png|thumb|center|300px]]<br> |
| - | [[Image: | + | [[Image:Oct12aa.png|thumb|center|400px]] |
<br> | <br> | ||
| - | + | Once the image has been uploaded, the folder will look like this inside: | |
<br> | <br> | ||
| - | [[Image: | + | [[Image:Oct12ab.png|thumb|center|450px]]<br> |
| - | + | We must do the same for students from country_2 to upload their photos. | |
| - | + | ||
| - | + | ||
| - | + | Now, the '''Presentation''' activity page looks like this: | |
<br> | <br> | ||
| - | [[Image: | + | [[Image:Oct12ac.png|thumb|center|500px]]<br> |
| + | <center> | ||
| + | <swf height="400" width="600">http://atenea.pntic.mec.es/cprn0003/cas/u5/TSBiblioteca/TSBiblioteca.swf</swf> [http://atenea.pntic.mec.es/cprn0003/cas/u5/TSBiblioteca/TSBiblioteca.htm <br> View on full screen] <br> | ||
| + | </center> | ||
| + | <br> <br> <br> Once the students’ descriptions and photos are available, they will start to have doubts about matching and they will have to ask their partners some questions, which will be done through the '''Forum'''. <br> | ||
<br> | <br> | ||
| - | + | ==== How to create and participate in the Forum<br> ==== | |
| - | + | The '''forum''' is a communication tool in '''TwinSpace'''; it is a place where one can establish discussion lines and comments, where participants can express their opinions about an open topic and continue with that discussion. It is easy and intuitive to use. Prior to making a general use, the space manager must open a topic for discussion.<br> | |
| + | |||
| + | Remember that we must continue in the folder '''Presentation '''and that we created a '''File Archive (1)'''and an'''''<i>Image gallery'</i>'''(2)''', as you can see in the image below; now we shall add to this folder a collaboration tool, the '''Forum (3)'''. It will appear in the viewer under the Image gallery. | ||
<br> | <br> | ||
| - | + | [[Image:Oct12Foro1.png|thumb|center|250px]] | |
| - | + | [[Image:Oct12Foro2.png|thumb|center|550px]]<br> | |
| - | + | - To start participation in the forum we will click on '''Add category'''. <br> | |
<br> | <br> | ||
| - | [[Image: | + | [[Image:Oct12Foro3.png|thumb|center|450px]] |
<br> | <br> | ||
| - | <br> | + | .- Write the name of the topic we want to start with and a descriptive text. We can see it is possible to activate mail lists to send internal messages, although this will appear in the advanced settings. Some of these options may be inactive or cannot be used in the workspace. Once the fields have been completed we can click on Save, as usual.<br> <br>[[Image:Oct12Foro4.png|thumb|center|450px]]<br> |
| - | + | When returning to the '''Presentation''' page we can see what the forum looks like. <br> | |
<br> | <br> | ||
| - | + | [[Image:Oct12Foro5.png|thumb|center|450px]]<br> | |
<br> | <br> | ||
| - | + | Intuition and experience will tell us how we can insert a text in the forum. ro. | |
<br> | <br> | ||
| - | .- | + | .- We must choose the folder where we want to insert a comment and then click on '''Post new thread'''. |
<br> | <br> | ||
| - | [[Image: | + | [[Image:Oct12Foro6.png|thumb|center|450px]]<br>The rest is easy: a line to insert a specific topic, a space to make a comment, a box we can activate if we want to ask a question and get answers, and - lastly- as usual and if we agree we must click on '''Save'''. <br> |
| - | + | ||
| - | + | ||
<br> | <br> | ||
| - | [[Image: | + | [[Image:Oct12Foro7.png|thumb|center|450px]]<br> |
| - | + | We can see what the message we inserted in the forum looks like. We can see different details, such as creating another discussion line, replying, replying by quoting, organising messages and answers, and even - on the left - the personal data of the person who has made the comments, as well as other details such as date, recent messages, etc. <br> | |
<br> | <br> | ||
| - | . | + | [[Image:Oct12Foro8.png|thumb|center|450px]]<br> |
| - | + | Frequent and regular communication amongst partners is important, so it is necessary and advisable to answer to the messages in the forum. Partners will appreciate this gesture and it will enrich the project contents. | |
| - | + | ||
| - | + | ||
<br> | <br> | ||
| - | + | <center> | |
| - | + | <swf width="600" height="400">http://atenea.pntic.mec.es/cprn0003/cas/u5/TSForo/TSForo.swf</swf> [http://atenea.pntic.mec.es/cprn0003/cas/u5/TSForo/TSForo.htm <br> View on full screen] <br> | |
| - | + | </center> | |
| - | + | ________________________________________________________________________________________________ | |
<br> | <br> | ||
| - | + | The project continues in time and we can now go on to the next stage: the work plan. In this folder you can also include documents with the tasks suggested for students to work on and other documents for organisation, agreements, timing, curriculum, etc.<br> | |
| - | + | Let’s go back to the example. Bearing in mind the students’ descriptions, photos and comments made in the forum, students have been identified and the coordinator teachers have created mixed work groups, each of which includes students from both participating schools. | |
<br> | <br> | ||
| - | + | ''Save the file with the student distribution in Twinspace. '' | |
| - | + | The next stage is '''Search for information'''. Based on the task suggested by coordinators, we are going to use the tool web content viewer to save links, videos, etc. provided by the groups of students. | |
| - | + | ||
| - | + | ||
| - | + | ||
| - | + | ||
| - | + | ||
| - | + | ||
| - | + | ||
| - | + | ||
<br> | <br> | ||
| - | ==== | + | ==== How to add and use the tool Web Content display<br> ==== |
| - | + | With this tool we can create notes that look like a webpage in our workspace. Unlike with other tools inserted, we can place in only single pages as many modules of web contents as we deem advisable.<br> | |
| - | + | We are going to create the activity '''Search for information'''. We repeat the process which has just been explained about creating activities, inserting in this case the tool ''View web content''.<br> | |
| - | + | ||
| - | + | ||
<br> | <br> | ||
| - | [[Image: | + | [[Image:Oct12Visor1.png|thumb|center|550px]]<br> |
| - | + | The appearance our activity will have once we enter it will be as follows:<br> | |
<br> | <br> | ||
| - | [[Image: | + | [[Image:Oct12Visor2.png|thumb|center|550px]]<br> |
| - | + | The icons that allow us to modify the viewer content are shown in the graph: | |
| - | 1. | + | 1. This icon allows us to modify the title of the content viewer window. |
| - | 2. | + | 2. This icon allows us to create new content for the viewer. |
<br> | <br> | ||
| - | + | Carrying on with our example, students in GROUP_A are going to give the element a title: '''Information_GROUP_A''' (here you will see the information received). | |
| - | .- | + | .- Click on icon'''1''' and you will see this small window to insert the title:<br> <br> [[Image:Oct12Visor3.png|thumb|center|300px]]<br> |
| - | + | Now we shall insert the content. Click on icon 2. You will see a text editor opening, where we can add images, videos, links, etc. and change the format and font, colours, backgrounds...As we can see we have a tool bar similar to that of a word processor which will allow us to format our web contents.<br> | |
<br> | <br> | ||
| - | + | [[Image:Oct12Visor4.png|thumb|center|500px]]<br> <br> '''How can we insert a video?'''<br> | |
| - | + | First we click on the bar in the format which allows us to see the HTML code of the content of the viewfinder.'''<br> '''<br> | |
| - | [[Image: | + | [[Image:Oct12Visor5.png|thumb|center|450px]]<br> |
| - | + | We will write an introduction and then we will look for the video we wish to embed and the code which is inserted in the webpage where the video is. This is the case in the box. | |
<br> | <br> | ||
| - | [[Image:Img 5 67.png|center| | + | [[Image:Img 5 67.png|thumb|center|400px]]<br> |
| - | + | ||
| - | <br> | + | |
| - | + | <br>Each web is different, but when you see the Word '''"embed" '''or '''"share a code" '''it means it is not too far from there! | |
| - | + | We shall copy this code by right clicking, and then we will return to TwinSpace, click on '''HTML code''' and paste the code in the box. | |
<br> | <br> | ||
| - | [[Image: | + | [[Image:Oct12Visor6.png|thumb|center|500px]]<br> |
| - | + | Click on '''HTML code''' again and then '''Save'''. This is what the content viewer we have created looks like:<br> | |
<br> | <br> | ||
| - | [[Image: | + | [[Image:Oct12Visor7.png|thumb|center|500px]]<br> |
| - | + | Now, the link ''Edit web content ''at the bottom would allow us to modify the content if necessary. | |
| - | <br> | + | <center> |
| + | <swf width="600" height="400">http://atenea.pntic.mec.es/cprn0003/cas/u5/TSContenidoWeb/TSContenidoWeb.swf</swf> [http://atenea.pntic.mec.es/cprn0003/cas/u5/TSContenidoWeb/TSContenidoWeb.htm <br> View on full screen] | ||
| + | </center> | ||
| - | ==== | + | ==== How to create a blog and make a contribution. Didactic uses<br> ==== |
| - | + | In the next stage of the project (remember it is only an example), we are to create a blog in the activity page '''Information analysis''', where you can discuss and study the information collected by students, and improvements are made to the content... | |
| - | ''''' | + | '''''Some didactic uses of the Blog:''''' |
| - | '' | + | •''Encourage students to write, exchange ideas and work collaboratively. <br>'' |
| - | ''• | + | ''• Keep the members of a project/group informed. <br>'' |
| - | '' | + | ''•Publish materials immediately and access the information and/or resources required to carry out projects/activities. <br>'' |
| - | ''• | + | ''• Improve academic contents by enriching them with multimedia like: video, sounds, images, animations or others.'' |
| - | + | ||
| - | + | ||
<br> | <br> | ||
| - | + | -In order to create the blog, choose the page '''Information analysis''' and add the blog collaboration tool. | |
<br> | <br> | ||
| - | .- | + | [[Image:Oct12Blog1.png|thumb|center|550px]]<br> |
| + | |||
| + | .-Now, add and publish the blog entry. | ||
<br> | <br> | ||
| - | [[Image: | + | [[Image:Oct12Blog2.png|thumb|center|400px]]<br> <br> |
| - | + | .- First, click on "Add post entry". <br> | |
| - | + | The screen you will see now is easy to understand and it includes the basic functions to work with texts; we are already familiar with this screen. | |
| - | + | ||
| - | + | ||
<br> | <br> | ||
| - | [[Image: | + | [[Image:Oct12Blog3.png|thumb|center|500px]]<br> |
| - | <br> | + | .-Insert the title, the content of the post and click on '''Publish'''. <br> |
| - | + | Once published, you can see the result of your post, with the format used, the links and other features. It is also open so that other participants can give their opinion and ideas at any time. We can see the name of the person who published. | |
| - | + | ||
| - | + | ||
<br> | <br> | ||
| - | [[Image: | + | [[Image:Oct12Blog4.png|thumb|center|500px]]<br> |
| - | + | ||
| - | <br> | + | |
| - | + | Should we wish to add comments to this post, click on the word in blue ''Comments''. | |
<br> | <br> | ||
| - | [[Image: | + | [[Image:Oct12Blog5.png|thumb|center|500px]]<br> |
| - | <br> | + | <swf height="400" width="600">http://atenea.pntic.mec.es/cprn0003/cas/u5/TSBlog/TSBlog.swf</swf><br> |
| - | <br> | + | [http://atenea.pntic.mec.es/cprn0003/cas/u5/TSBlog/TSBlog.htm View on full screen]<br> |
| - | |||
| - | |||
| - | <br> | + | ==== How to create a wiki and make a contribution. Didactic uses<br> ==== |
| - | + | Let’s move on to the next stage of the project and in the next activity page, '''Conclusions''' and '''results''', we shall use a wiki to present results. | |
| - | + | ||
| - | + | ||
<br> | <br> | ||
| - | ''''' | + | '''''Some didactic uses of the wiki'''''<br> |
| - | + | ||
| - | <br> | + | |
| - | + | • Create/develop contents for a topic or subject amongst a group of students.<br> | |
| - | + | • Promote a critical and constructive spirit.<br> | |
| - | + | • Support a collaborative/group project. <br> | |
| - | + | • Publish the results of a project.<br> | |
| - | + | • Promote communication amongst students of the same group.<br> | |
<br> | <br> | ||
| - | + | -In order to create the wiki, choose the page '''Conclusions '''and '''Results''' and add the '''Wiki''' collaborative tool. | |
<br> | <br> | ||
| - | + | [[Image:Oct12Wiki1.png|thumb|center|550px]]<br> | |
| - | <br> | + | The process to insert a wiki entry is as follows: first, edit the entry by clicking on the corresponding link. <br> |
| - | + | ||
| - | + | ||
<br> | <br> | ||
| - | + | [[Image:Oct12Wiki2.png|thumb|center|400px]]<br> | |
| - | <br> | + | Then you will see the screen to insert the text. <br> |
| - | + | ||
| - | + | ||
<br> | <br> | ||
| - | + | [[Image:Oct12Wiki3.png|thumb|center|400px]]<br> | |
| - | <br> | + | Before you start typing, pay attention to the box in red, ''Format''; although you can use Creole first, choose the HTML format as it is easier. <br> |
| - | + | ||
| - | + | ||
<br> | <br> | ||
| - | + | [[Image:Oct12Wiki4.png|thumb|center|500px]]<br> | |
| - | '' | + | If you click on'''Preview''' you will see what the article looks like. Once you agree with the way it looks, save it and carry on with the work. ''Note:'' do not pay attention to the bottom green box for now. |
| - | + | To change the text of a wiki page, just click on the Edit icon, as shown below: | |
<br> | <br> | ||
| - | [[Image: | + | [[Image:Oct12Wiki5.png|thumb|center|400px]]<br> <br> |
| - | + | Returning to the wiki, and in the case of the group of students, they have created a post with text, video and links to materials. | |
<br> | <br> | ||
| - | [[Image:Img 5 63.png|center| | + | [[Image:Img 5 63.png|thumb|center|500px]]<br> |
<br> | <br> | ||
| - | + | Like we did with the blog, should we wish to add comments to this post, we would click on the word in blue ''Add comments''.<br> | |
| - | [http://atenea.pntic.mec.es/cprn0003/ | + | <swf width="600" height="400">http://atenea.pntic.mec.es/cprn0003/cas/u5/TSWiki/TSWiki.swf</swf><br> |
| + | |||
| + | [http://atenea.pntic.mec.es/cprn0003/cas/u5/TSWiki/TSWiki.htm View on full screen] <br> | ||
<br> | <br> | ||
| - | + | And now we have reached the final stage of the project: '''Assessment. '''<br> | |
| - | + | No educational administration is going to request by default an assessment of an eTwinning project (except in those cases we have dealt with in previous units: Quality Label, Awards, others…); however, it seems necessary and advisable to do so because this process gathers different kinds of information to make wise educational decisions and improve the teaching-learning processes; it can also be used to state or prove the achievement of certain kinds of learning by the end of a period.<br> | |
| - | + | In addition to this, at first it is not always clear what kind of activity or tool is going to work in the group; that’s why it is so interesting to see what assessment students make of their own work and the activities. | |
| - | + | ''Note:'' in this particular project example we have worked in TwinSpace but you can also use other external tools and spaces to store materials and resources. Don’t forget about the importance of working in private and safe spaces. <br> | |
<br> | <br> | ||
| - | + | === Public and private TwinSpace <br> === | |
| - | <br> | + | One of the main features of the work station in eTwinning is the privacy and flexibility offered to students when it comes to working on the net. When we work with younger students in an "online classroom" many doubts will arise. In general, we would like to publish the contents but not students’ personal data or even their photos, even if they want to exchange them with their partners. In addition, teachers will create documents or assessments that may not be available to students, even if they are working on the same project. <br> |
| - | <br> | + | The Twinspace content can be totally or partly made public, depending on those in charge. They must agree on which are the activity pages to be published and which ones will be hidden. <br> |
| - | + | In order to publish a whole activity page, click on the tab for Project Activities so we can Publish/Hide each activity (TwinSpace page) in the project. For instance, we could have a private page (hidden) called Presentation where students from partner schools can safely share their photos, videos or descriptions to help them get to know each other. <br><br> | |
| - | [ | + | [[Image:Gestionar_herramientas_TwinSpace.png|thumb|center|550px]]<br> |
| - | + | Click on Manage Pages and you will see this window: <br> | |
| - | + | <br> | |
| - | {| | + | [[Image:Público_privado_TwinSpace.png|thumb|center|550px]]<br> |
| + | |||
| + | If you see the word Publish, it means that it is hidden. <br>If it is hidden and you want to make it public, just click on Publish. <br><br> | ||
| + | |||
| + | {| style="width: 100%;" class="FCK__ShowTableBorders" | ||
|- | |- | ||
| style="width: 50%;" | ''Back to [[Unidad 5|Unit 5]]'' | | style="width: 50%;" | ''Back to [[Unidad 5|Unit 5]]'' | ||
| style="text-align: right; width: 50%;" | ''[[Documents 5.e: Create an activity page|<br>]]'' | | style="text-align: right; width: 50%;" | ''[[Documents 5.e: Create an activity page|<br>]]'' | ||
|} | |} | ||
| - | < | + | |
| + | <br> | ||
| + | |||
| + | [[es:Página Principal|es:Página Principal]] [[ca:Página Principal|ca:Página Principal]] [[ga:Página Principal|ga:Página Principal]] [[eu:Página Principal|eu:Página Principal]] | ||
Current revision as of 13:01, 20 November 2012
Back to Unit 5
Each TwinSpace has a fixed structure of 7 main sections that appear in the top menu of the page – Home, Project Activities, Staff Room, Pupils’ Corner, Chat and Guidelines. Although you can add or delete sections, we recommend that you do not change these seven which appear by default until you have mastered using the TwinSpace.
HOME
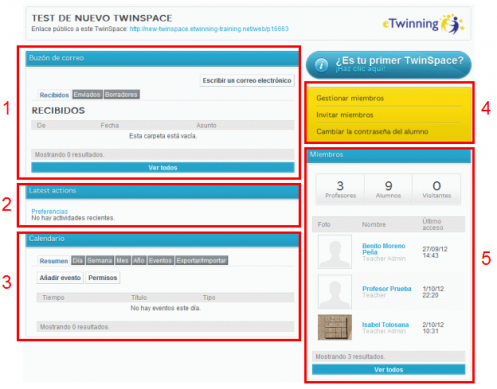
When teachers Access TwinSpace, the default section shown is HOME. Here you will find 5 modules:
1-'Inbox: this tool allows you to manage e-mails exchanged among the members of the TwinSpace (1 or several at a time).
2 - Latest actions: this window shows the last actions carried out in TwinSpace, with a link to the profile of the user who has done it and another link to the page where it has been done, such as a new post in a blog or the load of a document. Something similar to this image:
3- Calendar: with this digital tool you can add the dates of events that all participants are to remember. Each country has special dates that may not coincide with those of the partner country (local bank holiday, holidays…).
4- Organising members: this window offers us the possibility to add new members into TwinSpace: students, teachers and visitors. It also allows us to change the students’ password (Documents 6.b. User registration).
5- Members: from this window you can access the profiles of all TwinSpace members.
View on full screen
How to use the inbox
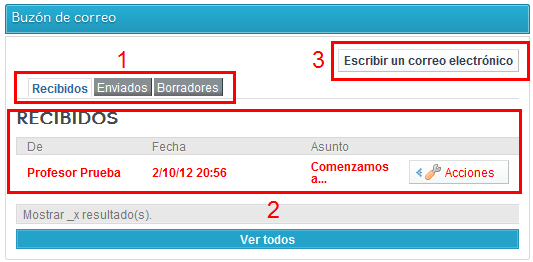
TwinSpace mail is internal, that is we can only send and receive messages from other participants in our TwinSpace. The TwinSpace mail module looks like this:
1.- Using these tabs we can access the three folders where messages are stored: Received, where the messages we have been sent by other participants are kept, Sent, where the messages we have sent are kept; and Drafts, where we can keep messages we haven’t sent yet.
2.-The messages in each folder appear in this area. We can see the content by clicking on the message. The Actions button allows us to see, answer or delete a message.
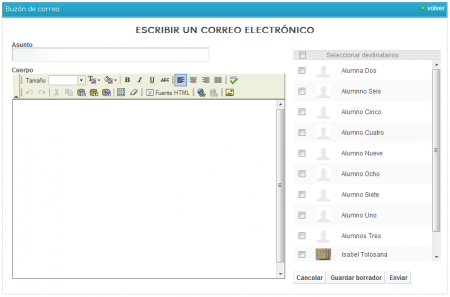
3.- The Write an e-mail button allows you to send a message to another participant in our TwinSpace. A window will appear like the one below.
We write the subject and the body of the message. Then we mark the TwinSpace participants we want to send the mail to (although it can be just one person if we wish). Finally we click on Send to send the message or Save Draft if we don’t want to send it but want to edit it later on.
View on full screen
How to insert an event in the calendar
The calendar is recommended to:
• Set dates and/or times for communication (chat sessions, posts in the forum, blog…).
• Set deadlines to hand in activities.
• Set important dates for the content of the project (Environment Day, Internet Day, Language Day, Peace Day, etc.).
• Remember dates that are connected with a certain work process (measuring temperature, looking for a piece of news in the paper, watching a TV channel, buying the paper…).
• Project start and end dates.
• Others.
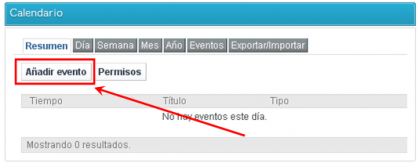
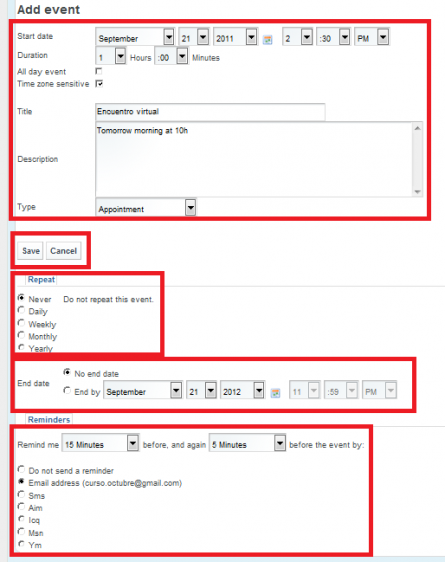
To add a new event to the calendar, we click on Add event.
Now you must fill in each of the fields requested. There are other possibilities you can choose depending on your needs. The system may even send a reminder to all those people involved. Once the first event has been included in the diary, click Save to move onto the next day.
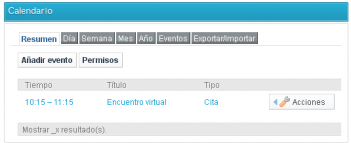
The event has been recorded in the TwinSpace calendar and now all participants can see it.
We can see that there are different options. If the note is not for today (date) but for tomorrow and we want to check when the event is being organised and what it is about, click on the word Week; should it not even be this week, we would click on Month or Year, depending on our needs. Now you will see a calendar showing the events inserted. In order to find out more details about each note/event, you simply have to click on the highlighted word.
View on full screen
PROJECT ACTIVITIES
To the right of the HOME tab you will see a section entitled PROJECT ACTIVITIES. Here you will develop you project; you can create new pages and manage them, and then publish, hide or delete the existing ones.
Coordinators and students will define the project structure and the activities to be done; all the members must agree on the structure both of the project and of the TwinSpace; otherwise, the Activity Page section will only be a series of unconnected pages, without no connection whatsoever to the general planning.
The “Project Activities” will be different in each TwinSpace because they will individually reflect the pedagogical objectives and the structure of each project.
In order to develop this section, we shall work with a very simple and basic example.
Let’s say that it is a project with two members from countries country_1 and country_2. The coordinators have designed the tasks to distribute the students into mixed-nationality groups. In addition, students are old and self-sufficient enough to access Twinspace and are members of TwinSpace (See unit 6). Let’s imagine that the work will be stored into Twinspace in the following order:
| Activity pages |
| 1.- Presentation |
| 2.- Work plan |
| 3.- Search for information |
| 4.- Information analysis |
| 5.- Results and conclusions |
| 6.- Assessment |
How to create an activity page
First of all, we shall create an activity page and then we shall insert some collaboration and/or communication tools offered by TwinSpace. The process is simple: we must go to the Activity module and click on Manage tools.
A message appears with information on permission to see the activity which is going to be created. We click on Incorporate a tool… to continue.
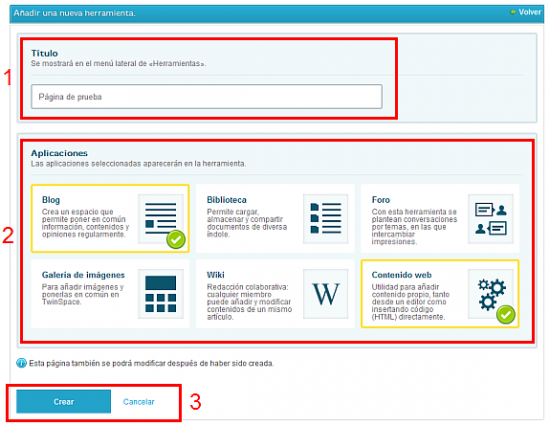
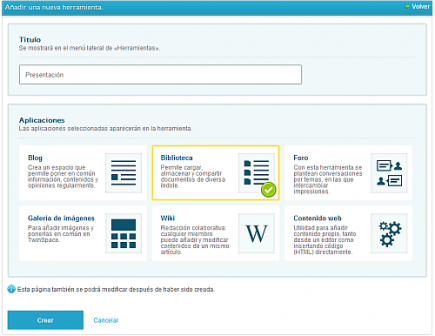
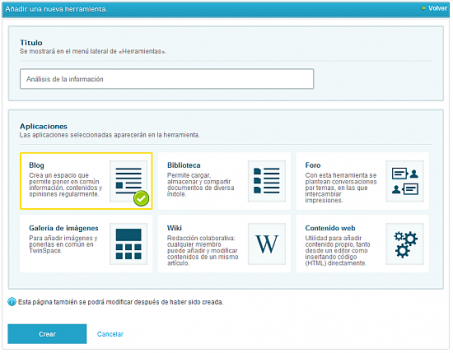
A form subsequently appears to create the activity which has three parts:
1.- In this area we type in the title of the activity. In this example we are going to create a page called Test Page.
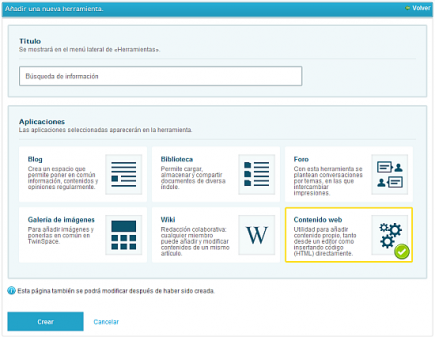
2.- We then have to decide which modules or applications we want to include in the activity out of the six possible choices: Blog, library, forum, image gallery, Wiki or web content. We don’t have to worry if we are going to need other modules or delete any we have chosen at a later date, as they can be changed at any moment. We will explain later on how each of the modules works.
3.- Once we have typed in the title and chosen some of the modules, click "Add". This is a simple way to build ourTwinSpace little by little.
When the activity is created a screen like this appears:
Using the “Publish” button we can make the activity publicly available, that is it can be seen by users who are not registered on our TwinSpace. If it is not published then it will only be accessible to those who are registered in the TwinSpace. It is the job of the teacher-administrator to publish or hide the page. A student cannot publish (which means allowing everyone to see the page). (See unit 6).
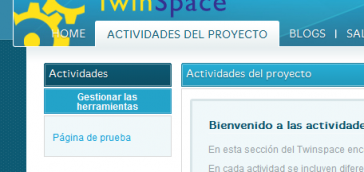
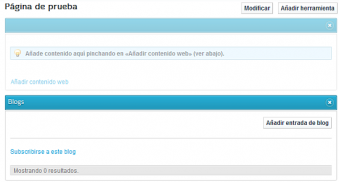
If we now click on the “Project Activities” tab we can see if we have created the “Test Page” correctly.
The initial look of a page that has just been inserted may be slightly barren, as only the inserted modules appear. However, now is when the administrators have to intervene (students or teachers), by creating different spaces where participants can work actively and dynamically. In our example, the appearance of the activity we have created is as follows:
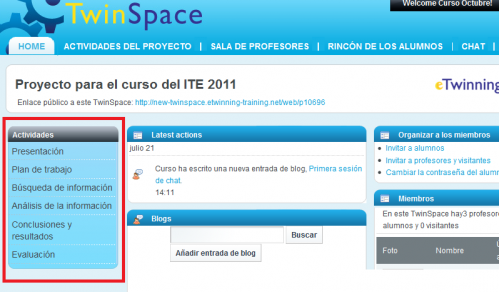
Repeating the process for creating activities, our project TwinSpace will look like this:
Before starting to work, students must become familiar with the structure of TwinSpace and feel curious and interested, as well as motivated to work on the project.
How to manage the modules into an activity page
Filling the different activity pages with content requires the use of the TwinSpace tools (blog, forum, wiki, document library, image gallery, web content manager), depending on the task to be done.
When an activity is created we have already indicated which modules we want it to provide. However, it is normal that we may need to add new modules or delete some of the existing ones.
We are going to insert different modules or tools in this section and we shall work on the basic possibilities; then we shall find out about the rest, although it is quite intuitive and deals with concepts we are used to seeing today with various ICT tools.
In order to add a tool, once we are on the page we want, click on the drop-down menu on the top right to see the different options. In this case, we shall choose Add tool. This can also be done using the Add tool button which appears in the top right hand corner of the activity.
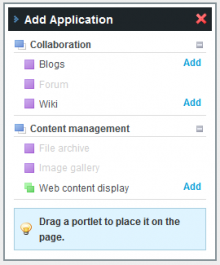
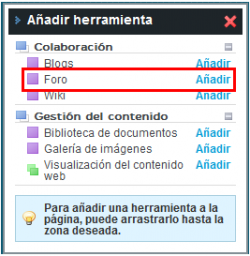
Now you will see a window on the left showing two alternatives: Collaboration and Content management. In order to know what each one contains, just click on the title and you will see this:
You will see: blogs, wikis, forum, libraries, galleries and web content viewers. A whole range of possibilities to insert into each of the pages we create in our TwinSpace; all we have to do is drag the tool from the window to the page where we want to place it. Click on the option you chose, a blog for instance, and then drag it to your page; in this case it was a Trial Page. The only thing we must bear in mind is the design, so that the page is not overloaded. Then, each participant will complete it as decided. In order to follow our example, we shall insert some of these basic options to see what the page looks like. Practice and time will help us discover many functions and possibilities for each tool.
Some final advice to prepare an activity:
• Plan what tools are to be included in each activity. Not to improvise, but rather see how we want to work and figure out what tools are more appropriate for that task. • Do not saturate the activity. Including more tools does not mean that it will improve, as it could be quite the opposite. You must be specific and not add useless tools.
• Do not saturate the activity. Including more tools does not mean that it will improve, as it could be quite the opposite. You must be specific and not add useless tools.
•Explain to students clearly what they are to do with each tool. It is advisable to spend time helping them understand how the different elements are used in each activity, as once they understand it will be easier to work.
View on full screen
Let’s start working on a project
We will start working on the project by following the design steps mentioned at the beginning of document 5.d.2., according to the order established on the activity page.
Remember it is only an example; coordinators are to decide on the number of activity pages, the names, the content, the tools to be used, etc.
| Activity pages |
| 1.- Presentation |
| 2.- Work plan |
| 3.- Search for information |
| 4.- Information analysis |
| 5.- Results and conclusions |
| 6.- Assessment |
Presentation
It is important to note that, when it comes to designing activities, we must think about how students are going to interact, both regarding their own tasks and their personal relationships; this stage of the project focuses on socialising online, including tasks that will promote solid interaction amongst partner students and which will make a positive contribution to their involvement in the project. In the folder entitled Presentation, we shall insert the tool Document library, where students will include a file with a short description of themselves. In addition, we shall insert an Image Gallery, where they can include their photo. Students from the partner school must match the photo and the profile. As students will have some trouble matching the photos and the descriptions, we will open a forum where they can ask questions and solve doubts.
Now they have all this information, students can start the tasks. They should have a scanned photo and a description of themselves. When doing this activity, it is advisable to assign each student a number so that the title of each photo will only have to be Photo 1, Photo 2, etc. Now we would give them a TwinSpace password each (see Unit 6), we would explain how to add a file into the document library, how to upload images into the image gallery and how the contributions to the forum must be made. Here we shall explain the process step by step:
How to upload files into the document library
- We are going to create the activity presentation, adding to it the tool "Document library".
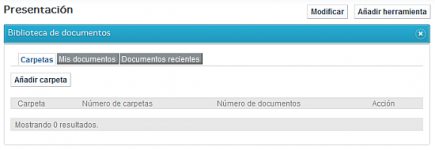
-Now we click on the activity “Presentation” so that it opens. We will see the Document Library in the page we want to work on.
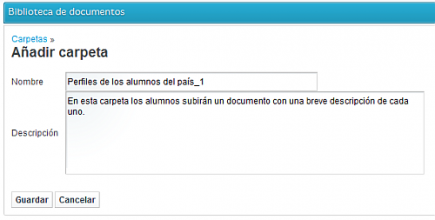
Click on Add folder. The system will show this image:
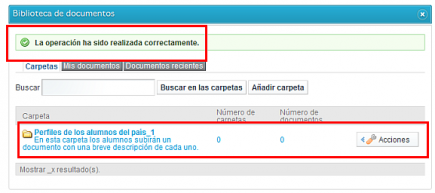
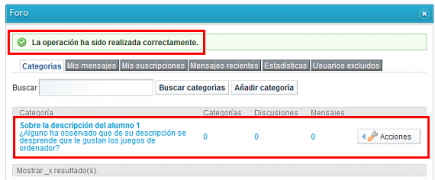
- Name the folder and provide a description; then click on Save and you will see a message in green. The page will now look like this:
The message verifies that the process is going correctly. To the right of the folder name you can see the number of subfolders and the documents that have been included, which in this case is 0.
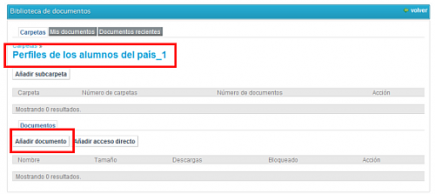
- In order to upload a file into the folder Profiles of students from country_1, click on the folder and you will see this window:
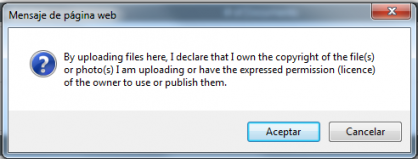
- Click on Add document. Before carrying out this action, the system will warn us on the rights regarding the materials we are going to upload into TwinSpace. Pay special attention to this warning. Do not upload resources (images, music…) if you are not sure about the rights that apply.
Let’s suppose we can accept.
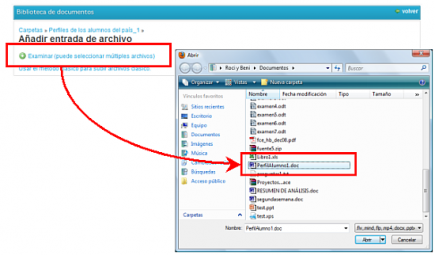
Look for the document to be uploaded, which in this case is the WORD document Profile_student_1.
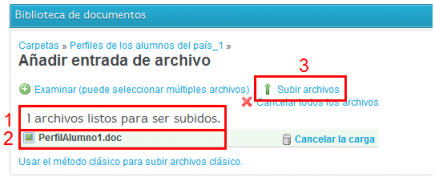
- Once you have clicked Open on the top right, you will see this:
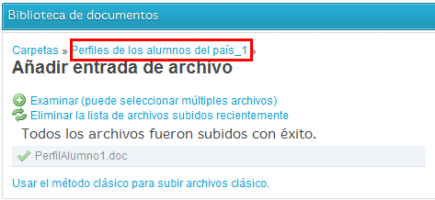
- Message 1 indicates that the file has not yet uploaded. Text 2 indicates that the file is going to be uploaded. Finally clic on Upload files (3) and the system will confirm if the file has been uploaded correctly.
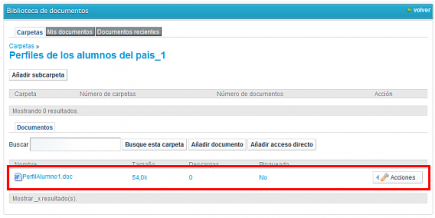
- Click on the light blue link Profiles of students from country_1 that is marked with an arrow and you will see the document inside the folder.
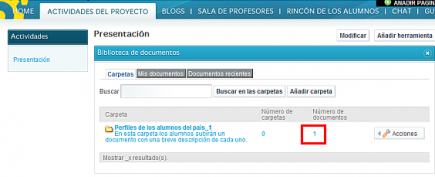
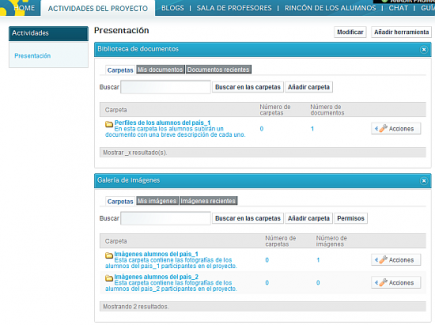
- If we now enter project activities > Presentation you will see that the activity page Presentation now looks like this:
How to add images into an Image Gallery
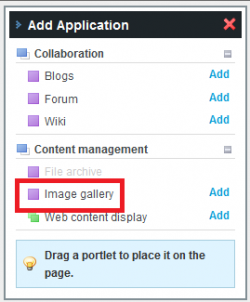
.- In the folder Presentation, create the Image gallery where students can upload their photos (images in general). In order to do so, we can return to the window Add tool and then to the section Content management, where you must choose Image gallery.
.- Insert the image gallery under the viewer (under the document library) that we created before, thus obtaining a new window:
We now have a gallery to include the photos, so the next step is to create two folders: one for photos of students from country_1 and another for photos of students from country_2.
.- To add a new folder inside the gallery, click onAdd folder.
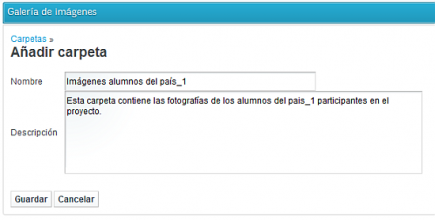
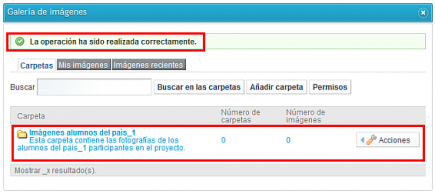
You will now see a window where you must insert a title and a description of the folder we are creating. Once the information has been inserted, click on Save.
.- Next to the folder you have created you will see the button Actions, which allows it to be edited (change the title and the description), delete it or manage permits.
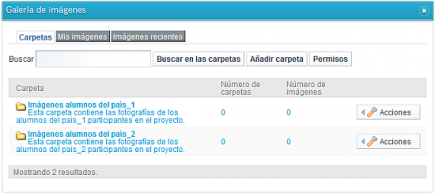
.- Repeat the process and create a folder inside the gallery so that students from country_2 can add their photos.
Our image gallery should eventually look like this:
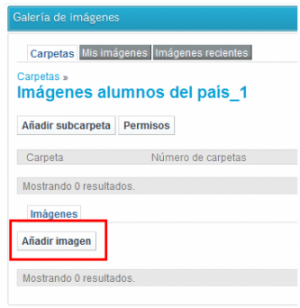
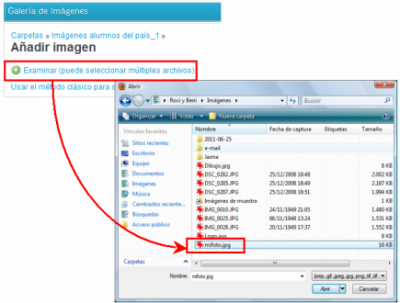
.-We can upload the photos into the gallery by taking the same steps we explained in the File Archive.
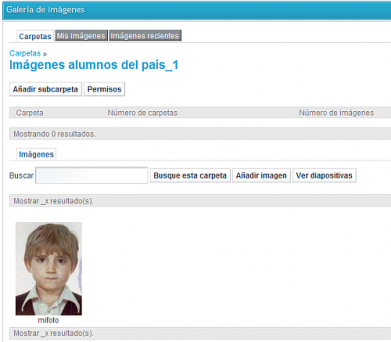
Once the image has been uploaded, the folder will look like this inside:
We must do the same for students from country_2 to upload their photos.
Now, the Presentation activity page looks like this:
View on full screen
Once the students’ descriptions and photos are available, they will start to have doubts about matching and they will have to ask their partners some questions, which will be done through the Forum.
How to create and participate in the Forum
The forum is a communication tool in TwinSpace; it is a place where one can establish discussion lines and comments, where participants can express their opinions about an open topic and continue with that discussion. It is easy and intuitive to use. Prior to making a general use, the space manager must open a topic for discussion.
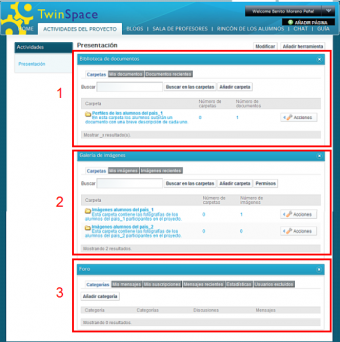
Remember that we must continue in the folder Presentation and that we created a File Archive (1)'and anImage gallery'(2), as you can see in the image below; now we shall add to this folder a collaboration tool, the Forum (3). It will appear in the viewer under the Image gallery.
- To start participation in the forum we will click on Add category.
When returning to the Presentation page we can see what the forum looks like.
Intuition and experience will tell us how we can insert a text in the forum. ro.
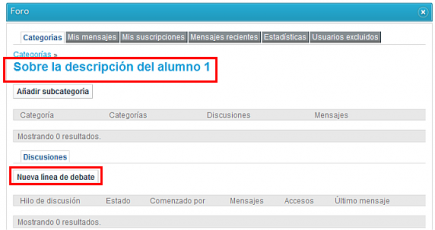
.- We must choose the folder where we want to insert a comment and then click on Post new thread.
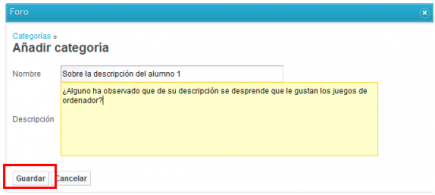
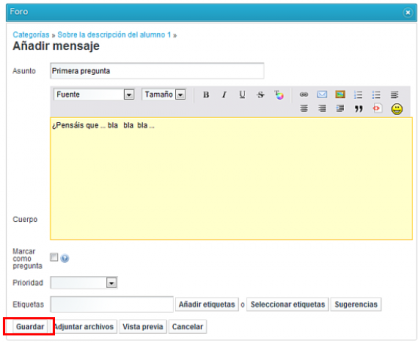
The rest is easy: a line to insert a specific topic, a space to make a comment, a box we can activate if we want to ask a question and get answers, and - lastly- as usual and if we agree we must click on Save.
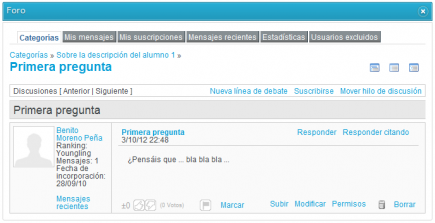
We can see what the message we inserted in the forum looks like. We can see different details, such as creating another discussion line, replying, replying by quoting, organising messages and answers, and even - on the left - the personal data of the person who has made the comments, as well as other details such as date, recent messages, etc.
Frequent and regular communication amongst partners is important, so it is necessary and advisable to answer to the messages in the forum. Partners will appreciate this gesture and it will enrich the project contents.
View on full screen
________________________________________________________________________________________________
The project continues in time and we can now go on to the next stage: the work plan. In this folder you can also include documents with the tasks suggested for students to work on and other documents for organisation, agreements, timing, curriculum, etc.
Let’s go back to the example. Bearing in mind the students’ descriptions, photos and comments made in the forum, students have been identified and the coordinator teachers have created mixed work groups, each of which includes students from both participating schools.
Save the file with the student distribution in Twinspace.
The next stage is Search for information. Based on the task suggested by coordinators, we are going to use the tool web content viewer to save links, videos, etc. provided by the groups of students.
How to add and use the tool Web Content display
With this tool we can create notes that look like a webpage in our workspace. Unlike with other tools inserted, we can place in only single pages as many modules of web contents as we deem advisable.
We are going to create the activity Search for information. We repeat the process which has just been explained about creating activities, inserting in this case the tool View web content.
The appearance our activity will have once we enter it will be as follows:
The icons that allow us to modify the viewer content are shown in the graph:
1. This icon allows us to modify the title of the content viewer window.
2. This icon allows us to create new content for the viewer.
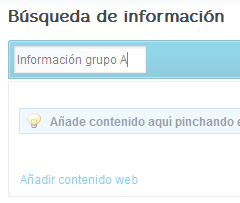
Carrying on with our example, students in GROUP_A are going to give the element a title: Information_GROUP_A (here you will see the information received).
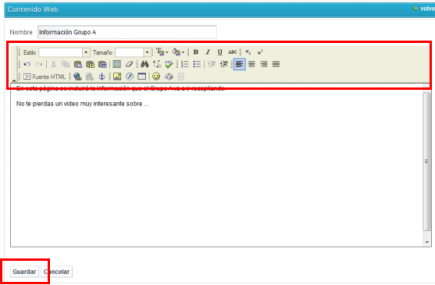
.- Click on icon1 and you will see this small window to insert the title:Now we shall insert the content. Click on icon 2. You will see a text editor opening, where we can add images, videos, links, etc. and change the format and font, colours, backgrounds...As we can see we have a tool bar similar to that of a word processor which will allow us to format our web contents.
How can we insert a video?
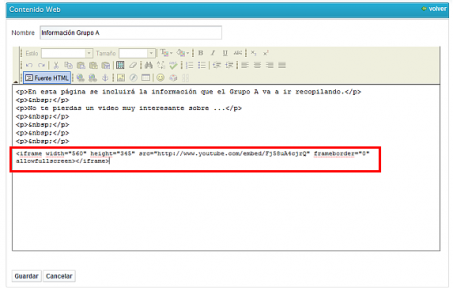
First we click on the bar in the format which allows us to see the HTML code of the content of the viewfinder.
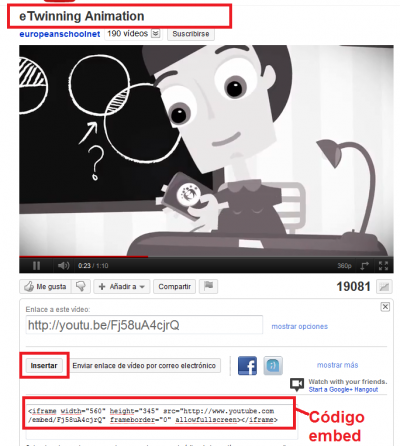
We will write an introduction and then we will look for the video we wish to embed and the code which is inserted in the webpage where the video is. This is the case in the box.
Each web is different, but when you see the Word "embed" or "share a code" it means it is not too far from there!
We shall copy this code by right clicking, and then we will return to TwinSpace, click on HTML code and paste the code in the box.
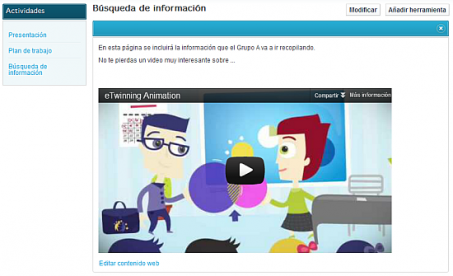
Click on HTML code again and then Save. This is what the content viewer we have created looks like:
Now, the link Edit web content at the bottom would allow us to modify the content if necessary.
View on full screen
How to create a blog and make a contribution. Didactic uses
In the next stage of the project (remember it is only an example), we are to create a blog in the activity page Information analysis, where you can discuss and study the information collected by students, and improvements are made to the content...
Some didactic uses of the Blog:
•Encourage students to write, exchange ideas and work collaboratively.
• Keep the members of a project/group informed.
•Publish materials immediately and access the information and/or resources required to carry out projects/activities.
• Improve academic contents by enriching them with multimedia like: video, sounds, images, animations or others.
-In order to create the blog, choose the page Information analysis and add the blog collaboration tool.
.-Now, add and publish the blog entry.
.- First, click on "Add post entry".
The screen you will see now is easy to understand and it includes the basic functions to work with texts; we are already familiar with this screen.
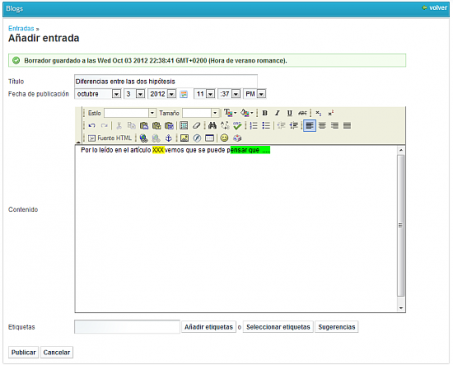
.-Insert the title, the content of the post and click on Publish.
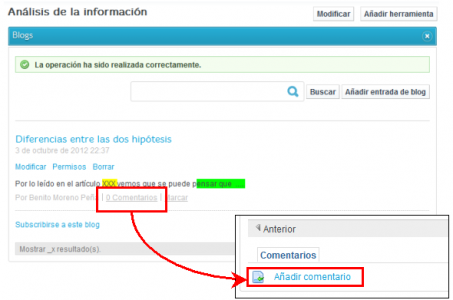
Once published, you can see the result of your post, with the format used, the links and other features. It is also open so that other participants can give their opinion and ideas at any time. We can see the name of the person who published.
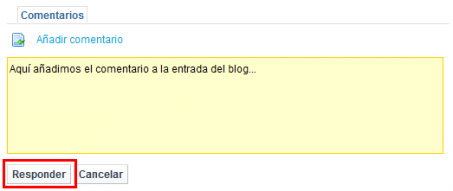
Should we wish to add comments to this post, click on the word in blue Comments.
How to create a wiki and make a contribution. Didactic uses
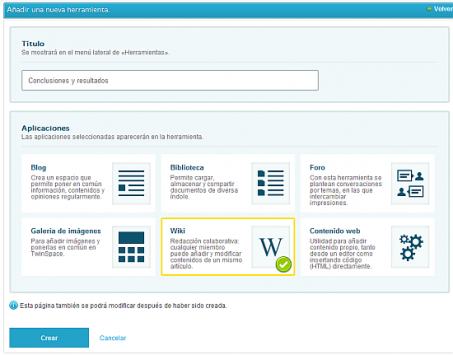
Let’s move on to the next stage of the project and in the next activity page, Conclusions and results, we shall use a wiki to present results.
Some didactic uses of the wiki
• Create/develop contents for a topic or subject amongst a group of students.
• Promote a critical and constructive spirit.
• Support a collaborative/group project.
• Publish the results of a project.
• Promote communication amongst students of the same group.
-In order to create the wiki, choose the page Conclusions and Results and add the Wiki collaborative tool.
The process to insert a wiki entry is as follows: first, edit the entry by clicking on the corresponding link.
Then you will see the screen to insert the text.
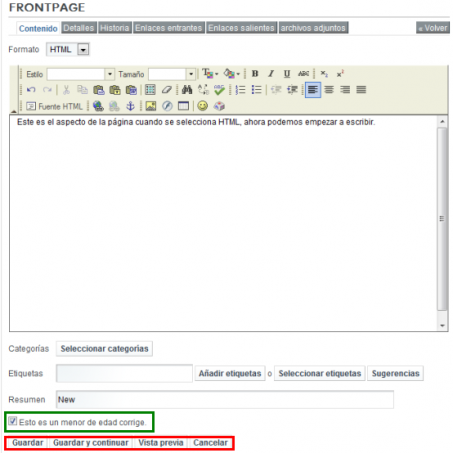
Before you start typing, pay attention to the box in red, Format; although you can use Creole first, choose the HTML format as it is easier.
If you click onPreview you will see what the article looks like. Once you agree with the way it looks, save it and carry on with the work. Note: do not pay attention to the bottom green box for now.
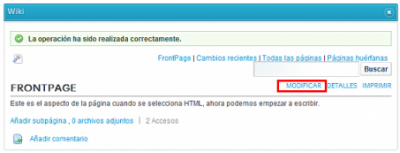
To change the text of a wiki page, just click on the Edit icon, as shown below:
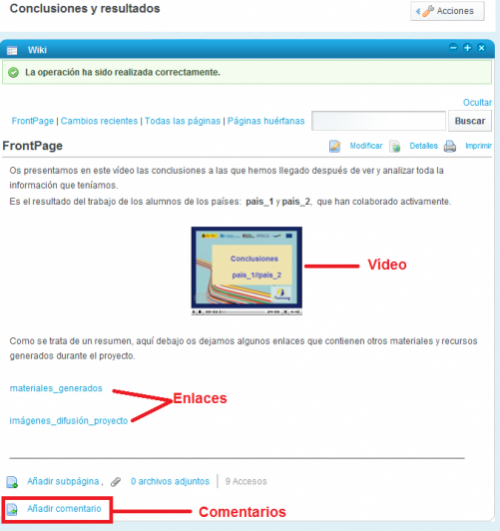
Returning to the wiki, and in the case of the group of students, they have created a post with text, video and links to materials.
Like we did with the blog, should we wish to add comments to this post, we would click on the word in blue Add comments.
And now we have reached the final stage of the project: Assessment.
No educational administration is going to request by default an assessment of an eTwinning project (except in those cases we have dealt with in previous units: Quality Label, Awards, others…); however, it seems necessary and advisable to do so because this process gathers different kinds of information to make wise educational decisions and improve the teaching-learning processes; it can also be used to state or prove the achievement of certain kinds of learning by the end of a period.
In addition to this, at first it is not always clear what kind of activity or tool is going to work in the group; that’s why it is so interesting to see what assessment students make of their own work and the activities.
Note: in this particular project example we have worked in TwinSpace but you can also use other external tools and spaces to store materials and resources. Don’t forget about the importance of working in private and safe spaces.
Public and private TwinSpace
One of the main features of the work station in eTwinning is the privacy and flexibility offered to students when it comes to working on the net. When we work with younger students in an "online classroom" many doubts will arise. In general, we would like to publish the contents but not students’ personal data or even their photos, even if they want to exchange them with their partners. In addition, teachers will create documents or assessments that may not be available to students, even if they are working on the same project.
The Twinspace content can be totally or partly made public, depending on those in charge. They must agree on which are the activity pages to be published and which ones will be hidden.
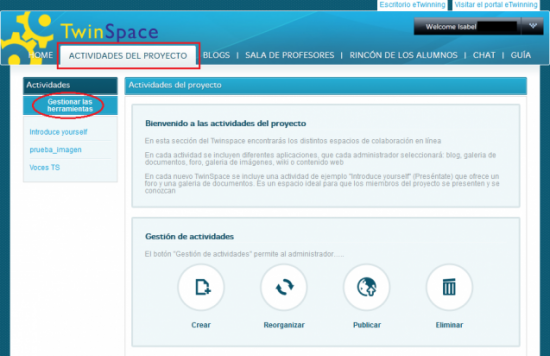
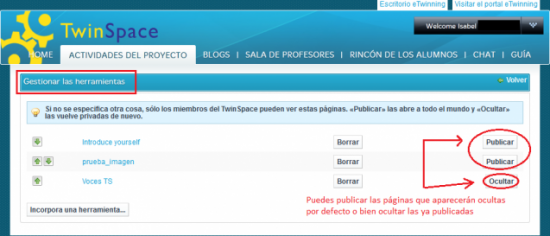
In order to publish a whole activity page, click on the tab for Project Activities so we can Publish/Hide each activity (TwinSpace page) in the project. For instance, we could have a private page (hidden) called Presentation where students from partner schools can safely share their photos, videos or descriptions to help them get to know each other.
Click on Manage Pages and you will see this window:
If you see the word Publish, it means that it is hidden.
If it is hidden and you want to make it public, just click on Publish.
| Back to Unit 5 | |

