Documents 4.b: How to register a project
From eTwinning
| Line 3: | Line 3: | ||
The documents in this section are summarised in the following animation: | The documents in this section are summarised in the following animation: | ||
| - | <swf width="600" height="400">http://www.etwinning.es/curso/animaciones/proy_registro/proyectoinscribir.swf</swf> | + | <swf width="600" height="400">http://www.etwinning.es/curso/animaciones/proy_registro/proyectoinscribir.swf</swf> |
| - | + | <u>Full screen </u> | |
| - | == | + | == How to register a project == |
| - | + | To register a project you need to have the corresponding teacher added in '''My contacts.''' | |
| - | <br> | + | '''<br>'''Once this is done, you can start the project. |
| - | + | ||
| + | |||
| + | Click on '''My projects''' | ||
<br>[[Image:4b 1.jpg|700px]] | <br>[[Image:4b 1.jpg|700px]] | ||
| - | <br> | + | <br>and then: |
<br>[[Image:4b 2.jpg|frame|center]] | <br>[[Image:4b 2.jpg|frame|center]] | ||
| Line 25: | Line 27: | ||
<br>[[Image:4b 03.jpg]] | <br>[[Image:4b 03.jpg]] | ||
| - | + | ||
| + | |||
| + | Click on '''Next''' at the top of the screen and a form will open up to insert all project data: | ||
<br>[[Image:4b 4.jpg|700px]] | <br>[[Image:4b 4.jpg|700px]] | ||
| - | <br> | + | <br>Once you have filled in all the fields, click on '''Preview''' and you will see all the data added. The form gives you the possibility of '''Modifying''' or '''Sending'''. Once you have clicked '''Send '''the project is registered and waiting for your partner to accept it. Once the project has been approved, these fields can still be modified, which will allow you to revise it as it develops. |
[[Image:4b 5.jpg]] | [[Image:4b 5.jpg]] | ||
| - | <br> | + | <br>Your partner will receive a meesage on his/her desktop asking him to accept the invitation. If your partner has sent the offer, then you will be receiving this notice. In any case, once the project has been approved, you can both add new partners and modify the initial data. |
[[Image:4b 06.jpg]] | [[Image:4b 06.jpg]] | ||
| - | <br> | + | <br>Once this has been done, a notice will be sent to the eTwinning National Support Service and your County, who will approve it. Once it has been completed, you can start working. |
Revision as of 00:27, 23 January 2010
Back to Unit 4
The documents in this section are summarised in the following animation:
Full screen
How to register a project
To register a project you need to have the corresponding teacher added in My contacts.
Once this is done, you can start the project.
Click on My projects
and then:
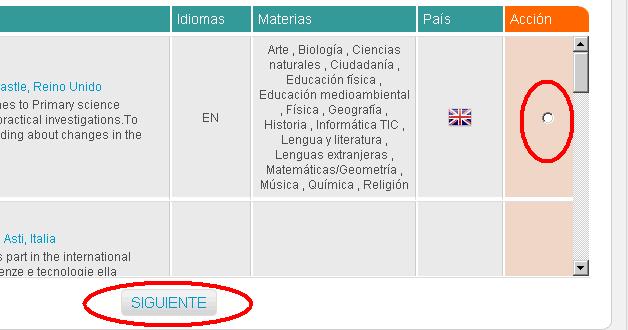
Te aparecerá la lista de tus contactos. Junto a su nombre, en la columna Acciones hay una casilla que te permitirá seleccionar el contacto con el que deseas hacer el proyecto. Recuerda que para iniciar un proyecto sólo puedes seleccionar un contacto. Si quieres que participen más, debes esperar a que el proyecto sea aprobado y entonces añadirlos como "socios anexados".
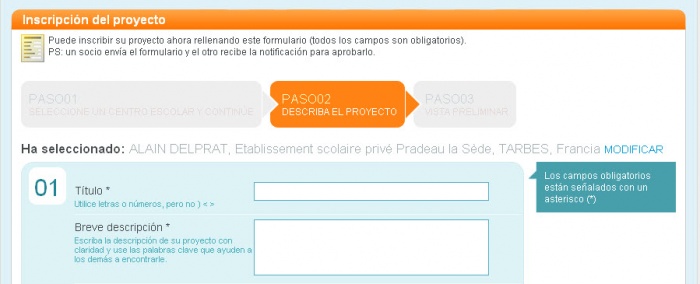
Click on Next at the top of the screen and a form will open up to insert all project data:
Once you have filled in all the fields, click on Preview and you will see all the data added. The form gives you the possibility of Modifying or Sending. Once you have clicked Send the project is registered and waiting for your partner to accept it. Once the project has been approved, these fields can still be modified, which will allow you to revise it as it develops.
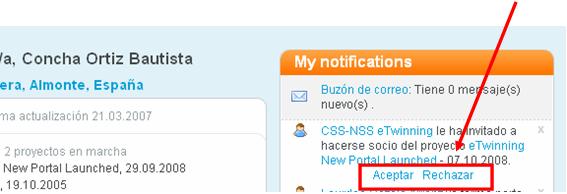
Your partner will receive a meesage on his/her desktop asking him to accept the invitation. If your partner has sent the offer, then you will be receiving this notice. In any case, once the project has been approved, you can both add new partners and modify the initial data.
Once this has been done, a notice will be sent to the eTwinning National Support Service and your County, who will approve it. Once it has been completed, you can start working.


