Documents 3.c: Desktop
From eTwinning
Back to Unit 3
Próximamente el contenido de este capítulo estará traducido al inglés.
Contents |
The eTwinning desktop
The eTwinning desktop is a virtual platform that allows us to manage our participation in eTwinning.
The main functions we can do from the eTwinning desktop are:
- Manage our profile. We can modify the data used for our registration in eTwinning, for us and for our school.
- Partner search. The idea is to find one or more European teachers who have the profile we want to start an eTwinning project.
- Manage the existing projects. Once we are working on one or more projects, we will be able to see news about them, access their work environment, etc.
Access to the eTwinning desktop.
Once we have confirmed our registration in eTwinning, we will get a username and password to access the eTwinning Desktop.
To access the desktop, start from the Spanish eTwinning NSS website, at the address http://www.etwinning.es (you can also do it from the CSS, at http://www.etwinning.net). Once you are in, go to the top right area and open the “Quick links” drop-down panel, and in the centre you will see a box to insert the username and password we chose when we registered in eTwinning.
One you have inserted these data, click on "Connect" and you will be in.
Sections in the Desktop.
At the top if the eTwinning Desktop we can see several tabs that allow us to access each of the sections comprising it, which we shall now describe.
Homepage
The Homepage appears when we access the Desktop. It provides some direct links to the most important sections in the Desktop.
The highlighted areas in the image above are:
- Selection tabs. They allow us to change from one section to another. Here you can see the 'Homepage' section.
- Personal profile. This ares is reserved to add a photo that can be seen by other eTwinning users.
- Welcome message.
- Editing the teachers' profile. You can change personal data, school data, preferences and/or add our photos or photos of our school.
- Close session. To exit the Desktop.
- Inbox. Direct link to the inbox, showing us whether we have any new messages.
- Permanent welcome message to the new Desktop, launched on October 1st, 2010.
- News from Spain. You will see a list of news published by the Spanish NSS to inform all users of the most relevant news taking place in the eTwinning actions.
- Resources. A source of materials and activities for users.
- Groups. The eTwinning groups are communities of teachers focusing on a common theme of interest. This is new in the platform, and we shall be analysing this section at the end of unit 6.
- Learning events. They are training activities for teachers, short and intensive virtual encounters - between one and two weeks long - dealing with different subjects ate different levels and subjects. This section is new in the platform, and we shall be analysing it at the end of unit 6.
- Teachers' rooms. These spaces are created by users to discuss certain topics of interest informally.
News. Located on the top right corner of all tabs. Various messages are displayed:
- Contacts. It tells us whether anyone has asked us to be their contact (we can accept or decline the offer), or whether anyone has accepted being our contact (we will have previously sent them a request).
- Projects. It tells us about news in the projects we are working on (new users, cancellations, etc.).
Let's take a look at the next tab in the Homepage.
Profile
This section in the eTwinning Desktop offers information about the user (school, languages, contacts, their eTwinning career…), and it allows them to modify the data they used when they registered in the eTwinning desktop, both regarding personal and school data, preferences and a photo gallery of the partner and the school.
The areas highlighted in the previous image are:
1. Selection tabs. They allow us to change from one section to another. In this case, we would be in the 'Profile' section.
2. Photo to identify the registered teacher.
3. About me. Some data about the user (school, city, country, languages...).
4. My life in eTwinning. This section shows the eTwinning events we are involved in. For instance, someone who includes us in their contacts, registration in a project, etc. Note that you can see the following statements underneath:
I am available for an eTwinning project No Yes
I am available for a Comenius project No Yes
You must choose YES in the first one so that teachers from other countries can find and contact you to start a project; if you don't tick it, you will not appear in the Partner search engine and therefore will not be found by other European partners who may have the same ideas for a project as you. You will be missing out on a lot of opportunities.
5. eTwinning and me. My diary. In this section we can include interesting messages or news that can be read by other eTwinning users visiting our profile. We can also leave notes on other users' notice boards, and they can leave us messages too.
6. My contacts. It shows a list of my contacts - teachers you have chosen through the search engine and who have accepted becoming your contacts - and who have been recently active. At the bottom you can see the link to add new contacts and also see the other user's contacts.
7. My Projects. A list of active projects led by the teacher. The bottom links allow us to create a new project and see all the projects the teacher has taken part in. Both links take us to the Projects tab.
8. My Teachers' rooms. It shows a list of teachers' rooms the user belongs to and, at the bottom, the links that take us to the Teachers' rooms tab, which will be studied in further detail later on.
Projects
This section allows us to manage the projects we are already working on, as well as start other new ones.
The areas hilghlighted in the above image are:
1. Selection tabs. They allow us to change from one section to another. In this case, we would be in the 'Projects' section.
2. Projects. It briefly describe a series of actions that can be carried out from this area with the projects (invite new members, request a Quality Label, etc.). All these actions are detailed step by step in Unit 4.
3. Open. Closed. Pending. By clicking on each section, we will see a list of the eTwinning projects we are working on, those that are closed and those that are pending approval.
For each project we can see the following information:
- Our photo, if we have uploaded it.
- Name of the project and registration date.
- Project quality labels. The Quality Label is a special acknowledgement to the best eTwinning projects. The Quality Label can be requested from this section.
- Actions. Here we can see links to register new members, modify certain aspects of the project, access TwinSpace, etc.
4. Search. We can search for an eTwinning project by description, topic, age and/or language.
5. Creating a new project. This link takes us to a form to register a new project.
Finding partners
The first step to be taken after registering in eTwinning is to find a partner to agree on a project with. To find a partner who can adapt to our expections, the eTwinning Desktop offers its users the 'Finding partners' section. In this section we can see two useful tools to search: search per key work and and the partner search forum.
The areas highlighted in the above image are:
- Selection tabs. They allow us to change from one section to another. In this case, we would be in the 'Finding partners' section.
- Quick search. Search per key word. It allows us to search for other eTwinning users using some key words (it can be used to directly look for someone we already know, name, surname, school...).
- Advanced search. It allows us to filter words per fields (position at the school, country, region, subject, etc.)
- Forum. It allows us to read other users' messages, where they explain their project ideas and invite us to take part. We can also leave a message stating our preferences for a future project or the profile of the teacher we are looking for. Perhaps this is the best resource to find a partner if we do not already know one. Note that it is organised into sections according to the ages of the students taking part in the project, as well as another more specific one to search for partners to start a school association within a Comenius action, as well as another general one.
- Are you interested in using an eTwinning kit? If you tick this box, a vertical drop-dwon list will appear, showing all the kist available in the NSS site, which can become an idea and/or inspiration for a future project.
- Available for an association of another Comenius action? If you tick this box, the list of teachers that appear after the search will show those who have ticked “available for a Comenius project", as we mentioned in section 4 of the Profile/My eTwinning life tab.
- Available for an eTwinning project? If you tick this box, the list of teachers that appears after the search will show those who registered in the eTwinning platform.
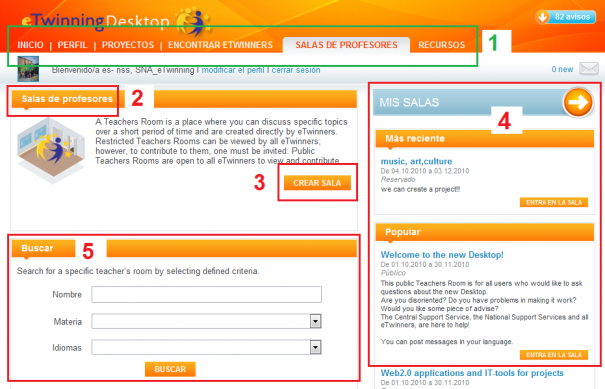
Teachers' rooms
These spaces are created by the teacher to discuss specific topics for a limited period of time, a maximum of two months. Teachers' rooms may be public or private. Public rooms are open and their content may be seen by all users, who may make contributions without any restrictions. Private rooms can be seen by all users but they can only contribute if they are invited.
The areas highlighted in the previous image are:
- Selection tabs. They allow us to change from one section to another. In this case we would be in the 'Teachers' Rooms' section.
- Teachers ' rooms. A short description of what they are, which we have already seen in the previous section.
- Creating a room. This link takes us to a form where all data must be specified (Title or Name of the room, description, subjects, duration, language, etc.).
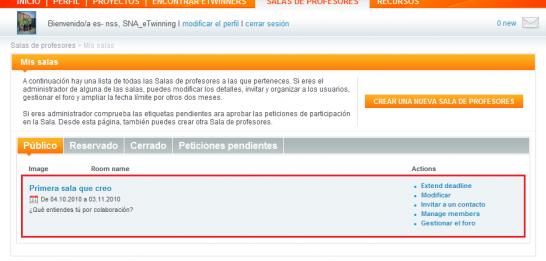
- My Rooms. At the top of the box you can see the title or name of the room and the period of time the last room created by the teacher is going to be open. The horizontal arrow inside the circle has a list of the rooms that each user has created and/or is taking part in.
•Popular. List of rooms with the highest number of participants.
5. Search. It allows to search for teachers' rooms one may be interested in. The search can be done by room title, subject of discussion and/or language.
Resources
It is a source of educational resources created by users. You can use them freely and you can also offer your own. This material may become a model to design an activity, decide on the use of a tool, plan the type of collaboration with partners, etc.
The areas highlighted in the above image are:
- Selection tabs. They allow us to change from one section to another. In this case we would be in the 'Resources' section.
- Resource search, loading and management. As you can see in the image, you can search for educational resources that have already been labelled per subject, students' ages and the language they are published in; you can also load your own, if you think they may be useful for others, and manage them (erase, edit...).
- Last resources added to the log.
- External resources. Here we have some resources that the NSS considers interesting for the eTwinning community.
We shall now take a closer look at the most relevant tabs and links, which are essential for satisfactory participation in eTwinning.
Updating the profile
An important step before starting to search for a partner to start an eTwinning project with is to make ourselves known. Once we have contacted another European teacher, the first thing they will do is check our profile, so we must make sure there are no wrong data, and try to transmit as much information as possible about our expectations regarding eTwinning.
As we explained in the previous section, the 'Profile' sections will be seen by those teachers who are interested in contacting us for any reason.
In the Homepage and Profile tabs, we can see a blue link: Modify profile.
In the registration process, some wrong data may have been inserted, or perhaps some of the circumstances around us have changed (teacher, school, subjects, students…). We shall now describe the Profile edition in detail by studying the sections it offers us. Click on Modify profile.
Editing the user profile
This section in the eTwinning Desktop allows us to modify the data used to register in the eTwinning directory, both personal data and data about our school, preferences and the gallery with our photos and photos of our school.
The areas hihghlighted in the above image are:
- Selection tabs. They allow us to change from one section to another. In this case, we would be in the 'Profile' section.
- Profile options: Personal. The school. Preferences. Photo gallery. This area is reserved to modify the data the user inserted when he/she registered in the eTwinning platform. The idea is to state who we are, the way we are or we work, interests, hobbies and any other information about our personality we want other eTwinning users to know.
2.1. Personal.
The teacher's data. We can see our personal data in the centre of the screen and modify those that are wrong. Remember that the username cannot be changed. You can change the password and email address, as well as other important data. Should you have modified any of them, click on the 'Save information' button and the data will be changed.
Would you like to receive the eTwinning Newsletter? It is an online monthly magazine publishing the most important events taking place in different countries, as well as the Central Support Service (courses, workshops, campaigns, etc.). Register and you will learn new and interesting ideas.
Do you wish to receive news by email? When a general circumstance affects the entire eTwinning community, if this option is activated, you will receive an alert via email. The email address used is the one provided by the user when registering in the platform.
2.2. Schools.
1.- Vertical drop-down menu of the schools we have worked in and the school we are at now. Once we have chosen a school, at the bottom you will see information about it and the subjects the teacher is imparting.
2.- Adding a new school. You should only modify the data of our school if they are wrong or they have changed. If we have changed schools, we must add a new one.
IMPORTANT!
If once you have registered in eTwinning you change schools, you must not modify the data of your previous school. If you do that, you will be changing all the registers of all the teachers associated to that school. What you should do is add a new school. The process is the same as in the registration form; first you have to look for it in a list and, if it did not appear, register it.
Once you have done this, tick the schools as active or inactive (if you are sharing the school, you can keep more than one as active).
2.3. Preferences.
This is a form with a short description of our association preferences. In this section we can explain basic information about what we want to do in eTwinning: if we want to use a project kit, fields of work, languages, students' ages and, especially, provide a short description of our project expectations. If you change any of these data, click again on 'Save information'.
Lastly, we shall mention some data that must be updated, as they normally checked by potential partners:
Photo gallery-Image management
Whenever a potential partner accesses our profile to learn more about us, if they can see our photo and images of our school, they may get a better impression of what we are like.
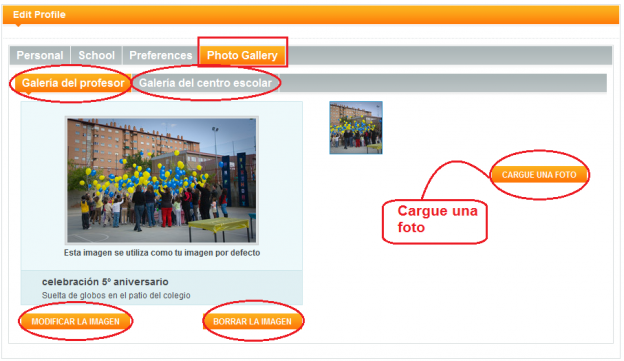
We can add images to two galleries from our profile:
- Teacher's gallery, where we can include our own images.
- School gallery, where we can include images of our school (avoid including images of our students).
When we access the profile of an eTwinning user, we can see their photo on the left (if they have uploaded more than one photo to the gallery, we can browse through them). If we click on the school name, we can see photos of it.
We shall now explain how to add an image to the 'Teacher's gallery'. We would have to go through the same process to add an image to the 'School gallery'. The first step would be to click on 'Upload a photo'.
We will have to provide different data:
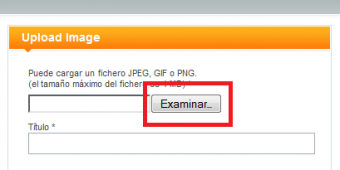
- Click on 'Search' and look for the image we wish to add to the gallery. Maximum size is 4MB.
- In 'Image title', we must add a title (compulsory).
- In 'Short description' we can add a short text describing the image (compulsory).
- It offers the possibility of only showing this image to eTwinning users or for anyone who visits the CSS website. Choose the option you prefer.
- Click on 'Send' to upload the image.
This is the result:
We can see the image we selected is in the gallery. This way, we can add as many images as we like.
When we choose an image, we will se several options:
Default image. By ticking this box, we can make this our default image, which means it will be the first image shown in our profile when other users check it.
Modify the image. By clicking here we can modify the title, the description and the place where the image will be seen.
Delete the image. If you wish to delete the image, click here.
The usual process is to add an image to the teacher's gallery and make it the default image. Therefore, eTwinning users who check our profile can see what we look like.
Lastly, if we return to the initial image in the Profile page, on the top right corner we will see:
3.- Deactivate your profile. If you deactivate your profile, you will not be included in the partner search system (you will not be visible to other users) and teachers will not be able to find you or contact you. If you deactivate it, you can activate it again at any time.
Partner search
In order to start an eTwinning project, you must find one or more partners whose profile adapts to our project expectations.
In some cases, a partner is a teacher from another country we already happen to know. But in most cases we must search and find teachers from other countries who wish to work with us.
In order to help with this task, the eTwinning Desktop offers teachers several useful tools to search for a partner, which means finding other teachers who wish to start an eTwinning project.
Search keywords
One of the options allowed in the eTwinning Desktop is to look for partners using keywords, such as the partner's name, the school or any other word that appears in the profile.
This method is especially useful when we already know someone and we wish to find them.
In order to do this kind of search, follow these steps:
In the eTwinning Desktop, access the section Find partners. Do a quick search for a teacher called Antonella. Once the word has been typed in, click on Search.
We will see a list of schools and eTwinning users featuring the word Antonella.
Several data are shown for each eTwinning user: links to their profile and their school, project languages, project topics, nationality of the school and a link to invite them to be our contact. 
If we are looking for partners through this system, we should check the profile to learn more about them and, if they match our requirements, invite them to become our contact (or even contact them directly by email).
We can also carry out an advanced search, by filtering some of the search fields (position in the school, country, subject, language, etc.). For instance, we can search for all those people who are going to work on Art in Spanish.
Once we click on Search we will see this screen:
As we mentioned in other paragraphs, several data appear for each eTwinning user: links to the profile and the school, project languages, project topics, nationality of the school and a link to invite them to become our contact.
The advanced search system allows us to get a list of users with the restrictions we have stated. Once again, the best way to do this is to check each user's profile and invite those who match our interests to be our contact.
Foro de búsqueda de socios
Se trata de un foro donde los docentes inscritos en eTwinning hacen propuestas de proyectos, exponen preferencias de idiomas o temáticas, etc., con el objeto de encontrar un socio que se adapte a su perfil.
El foro es especialmente útil cuando no conocemos a nadie de la plataforma previamente, y queremos encontrar un socio que quiera iniciar un proyecto con nosotros.
La mejor forma de actuar es leer los últimos mensajes que se hayan escrito en el foro: si vemos que alguno de ellos responde a nuestras ideas de trabajo o nos parece interesante, podemos responder al mensaje y entrar en contacto con quien lo escribió; o bien, si ninguno se adapta a nuestras expectativas, podemos dejar un nuevo mensaje en el foro y esperar que sea respondido.
Si deseamos dejar un mensaje en el Foro, conviene tener en cuenta:
- No se deben cerrar excesivamente nuestras expectativas. Conviene que el proyecto se vaya perfilando de manera paulatina con las propuestas que nos vayan llegando.
- Se debe utilizar un idioma comprensible por los potenciales socios que lean el mensaje. El inglés se suele utilizar de manera habitual, pero si queremos realizar un proyecto en otro idioma se puede utilizar dicho idioma para redactarlo.
Para acceder al Foro de Búsqueda de Socios, seguiremos los siguientes pasos:
- Dentro del Escritorio de eTwinning, entramos en el módulo Foro, en la parte superior derecha de la pestaña Encontrar socios.
- Seleccionar la categoría de edad de los alumnos con los que vamos a trabajar. Hacemos la prueba con el grupo de edad 12-15 años.
Nos devuelve esta imagen:
3. En la parte inferior podemos ver los hilos de debate y los datos que aparecen de cada hilo o tema de debate: Título del tema, el último mensaje que han dejado, autor/a y número de respuestas que ha generado la primera entrada.
4. Para leer los mensajes de un hilo, basta con hacer clic con el ratón encima del título del mismo.
5. Veremos el texto de los mensajes que contiene cada hilo y las respuestas que ha recibido hasta el momento, junto con los datos del autor. A la derecha de cada entrada aparecen dos iconos que nos permitirán responder a una intervención y poner una cita.
Crear un hilo o tema de debate nuevo
En el caso de que ninguno de los mensajes que leamos en el Foro nos parezca interesante, podemos crear nosotros un nuevo hilo de debate. En este segundo caso, tan sólo hay que esperar a que alguien nos responda: pueden llegarnos respuestas en el propio Foro, propuestas para incorporarnos a los contactos de otros usuarios o mensajes por el correo interno.
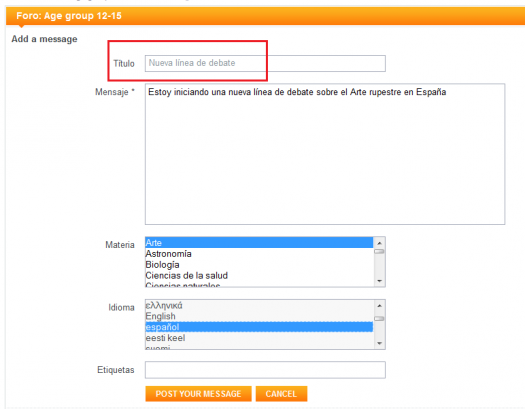
A.- Para iniciar nosotros una nueva línea de mensajes dentro del foro, haremos clic con el ratón en el botón de la parte central derecha, crear mensaje. Aparece un formulario en el que hay que rellenar los campos. Una vez escrito, haremos clic en el botón inferior 'Enviar este mensaje'.
El nuevo hilo de debate aparecerá en el foro ocupando una nueva fila.
La manera más conveniente de actuar para encontrar socio mediante esta herramienta es comenzar a leer los últimos mensajes que se han ido incluyendo en el Foro. Si uno de los mensajes responde a nuestras expectativas realizaremos dos acciones:
• Invitar al usuario que escribió el mensaje a formar parte de "Mis contactos". Así tendremos sus datos para comunicarnos con él en ocasiones posteriores.
• Responder al mensaje del Foro. Para ello, rellenamos el formulario del que hemos hablado en párrafos superiores.
• Incluso se puede, mediante el icono ![]() , enviarle directamente un mensaje privado de correo electrónico a su buzón de correo interno.
, enviarle directamente un mensaje privado de correo electrónico a su buzón de correo interno.
B.- Buscar un foro.
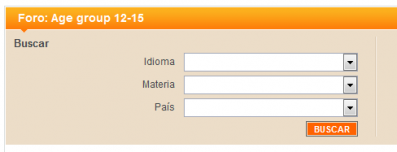
Si tienes bien definida tu idea de proyecto, el país por el que estás interesado/a y/o las materias implicadas, puedes hacer un filtrado de las líneas de debate que hay abiertas.
Suscripción a un hilo temático
Si dentro de un tema de debate aún no has encontrado nada que te interese, puedes suscribirte a él y recibirás información de las novedades que se produzcan; así será más fácil encontrar algo que se ajuste a lo que buscas.
Etiquetado
Dentro del perfil de cada usuario de eTwinning se incluye una breve descripción de las ideas de proyecto que tiene para mostrar de forma general sus expectativas en la acción eTwinning. Es en el proceso de registro en la plataforma virtual cuando el profesor rellena un campo obligatorio con esa información y cualquier usuario que visite su perfil podrá leerla.
La búsqueda de socio utilizando esta 'etiqueta' identificativa de cada usuario puede realizarse de dos maneras:
- Por una parte, un usuario de eTwinning ha podido ver nuestro perfil, leer nuestras ideas de cara a un proyecto y sentirse identificadas con ellas. En este caso, puede contactar directamente con nosotros.
- Por otra parte, nosotros podemos visitar el perfil de otro usuario y tal vez nos gusten sus expectativas de proyecto. Podemos contactar por correo con él.
Buzón de correo
Es posible que ya hayas reparado en que, en todas las pestañas del Escritorio hay un icono que se repite: un sobre identificativo del correo electrónico interno de la plataforma. Permite enviar mensajes a otros usuarios inscritos en eTwinning, que normalmente serán aquellos que tenemos como Contactos o que queramos incluir en esa lista.
Una vez que tengas entre tus contactos a algunas personas que respondan al perfil que buscas, puedes entablar con ellas una conversación a través de correo electrónico para decidir aquellos aspectos concernientes al proyecto que vais a realizar.
Puedes acceder al 'Buzón de Correo' desde cualquier pestaña del Escritorio haciendo clic en el icono del sobre.
Las partes que componen el Buzón de Correo son las que se muestran en la siguiente imagen:
1. Nos muestra las tres carpetas de mensajes que tenemos:
'Inbox/Entrada': es la que se visualiza por defecto y contiene los mensajes recibidos.
'Sent/Enviados': contiene los mensajes que hemos enviado.
'Trash/Papelera': contiene los mensajes eliminados.
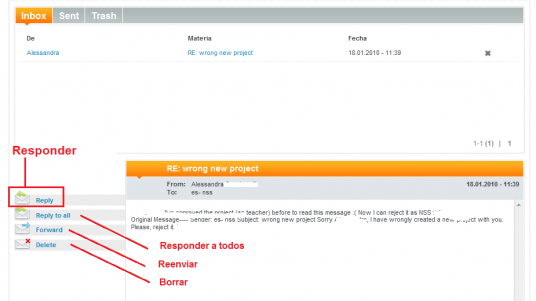
Al hacer clic en cualquiera de ellas, se mostrarán sus mensajes en el área de la parte baja. En la zona de la imagen aparecen los mensajes que hemos recibido, apareciendo en negrita aquellos que todavía no hemos leído.
De cada mensaje aparece el nombre de la persona que nos lo envía, el asunto, la fecha de envío y un icono para eliminar el mensaje.
Para leer un mensaje basta hacer clic en el asunto/materia o el/la autor/a.
Cuando se muestra el contenido de un mensaje, aparecen tres nuevas opciones sobre él: 'Responder', para volver a escribir a quien nos lo envió; 'Responder a todos', para enviar un nuevo mensaje a todos los que recibieron el mensaje que estamos leyendo, en el caso de que hubiese más de un destinatario; 'Reenviar', para enviar el mensaje íntegro a otro usuario de eTwinning; y borrar el mensaje.
2. Haciendo clic en este botón se puede redactar un nuevo mensaje. Aparecerá una ventana como la siguiente:
En primer lugar hay que indicar el destinatario (o destinatarios) del mensaje. Para ello, hacemos clic en el icono que está junto al campo 'A' ![]() . Aparece a la derecha una lista con tus contactos y puedes seleccionar en ella a los destinatarios. Análogamente podemos rellenar si lo deseamos los campos 'CC' (copia de carbón) y 'CCO' (copia de carbón oculta).
. Aparece a la derecha una lista con tus contactos y puedes seleccionar en ella a los destinatarios. Análogamente podemos rellenar si lo deseamos los campos 'CC' (copia de carbón) y 'CCO' (copia de carbón oculta).
Cuando hayamos rellenado los campos 'Asunto' y el contenido del mensaje, haremos clic en el botón 'Enviar un mensaje'.
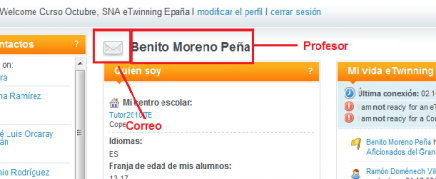
Indicar finalmente que existe una manera rápida de enviar un mensaje a cualquier usuario de eTwinning aunque no sea nuestro contacto. Basta visitar su Perfil y hacer clic en el icono con el sobre; nos devolverá la ventana con el destinatario ya relleno y sólo tendremos que redactar el mensaje.
| Volver a la Unidad 3 | Siguiente: Documentos 3.d: Preguntas Frecuentes |


